Author: Anony
When encountering a new software wallet/hardware signer, it is a good habit to first try using it on the Bitcoin testnet (rather than directly depositing valuable assets on the mainnet). This article will briefly introduce some practical suggestions for using the Bitcoin testnet.
Types of Testnet
As the name suggests, the testnet is for testing purposes, and its network may not exist permanently, and the test Bits have no value.
Currently, there are three public testnets suitable for individual users: testnet3, testnet4, and signet. The first two use the PoW mechanism to generate Blocks, while signet uses fixed network operator signatures.
Regardless of which testnet you use, the test Bits are not interoperable with other networks, so whether you are claiming test Bits (see below) or forwarding test Bits, you must first ensure the consistency of the network.
testnet3 was born with the release of Bitcoin Core 0.7, and has been running for 15 years. Due to the low Block difficulty on the testnet, on the one hand, it makes the Block generation speed unstable, and on the other hand, it makes it easy to suffer from "time warp attacks"; testnet4 was launched to solve these problems.
Currently, the testnet3 Blockchain has expanded tremendously, so if you try the "local synchronization of the testnet Blockchain" method mentioned below, it is not recommended to synchronize testnet3 anymore. You should consider synchronizing testnet4 or signet. But if you are trying to use the "public testnet service", you don't need to worry about these issues.
Public Testnet Service
For individual users, this is the most convenient method.
Generally speaking, quality Bitcoin software wallets will have dedicated testnet support and allow users to manually configure the backend to provide Blockchain data for the software, so we can directly use the public testnet service.
Taking the desktop Sparrow Wallet as an example.
After opening the main interface of the Sparrow Wallet, in the "Tool" option in the top left corner, select "Restart in ...", in the tab you can see the testnet types it supports, you can choose one from the above three:
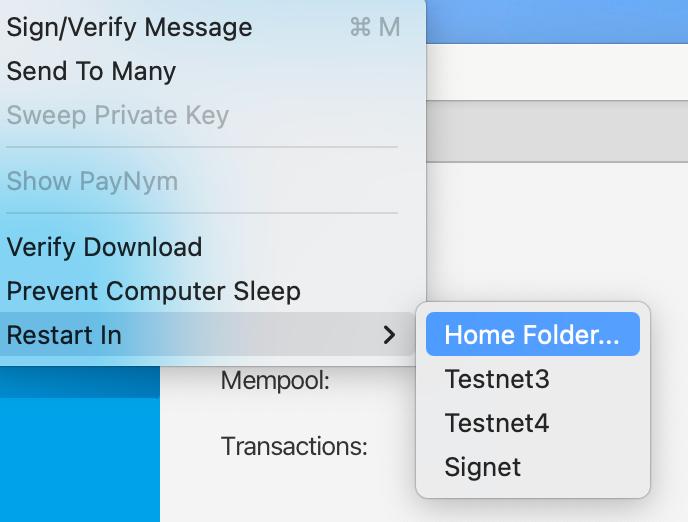
Note: In older versions of the Sparrow Wallet, you can only see the option "Restart in Testnet", without the ability to further select which testnet to use. In this case, testnet3 is used.
After restarting, in the "File" option in the top left corner, select "Preference", and then in the vertical card, select "Server", you can open the following interface:
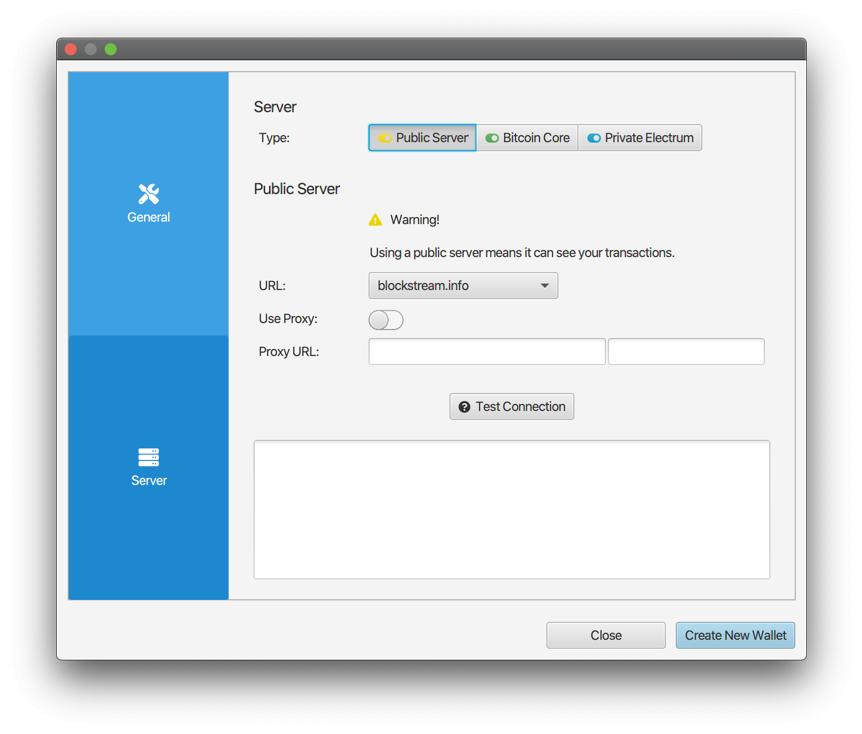
- Image from Sparrow Wallet Documentation -
The available server types ("Type") are three, the first "Public Server" is the public testnet service we are talking about here. You can select the site you want to use in the list of "URL" options below.
Then you can create a wallet in Sparrow according to your test needs. (Please note that you must not use the same seed words as your mainnet wallet.)
Please note: Although you can use the testnet through a public service, we strongly advise against using the mainnet in the same way. This will compromise your privacy. As Sparrow's wallet warning states: public servers can see all transactions related to your wallet; if they wish, the servers can further de-anonymize your wallet (e.g., through your IP address, IP geographic location, wallet usage habits, etc.).
Testnet Faucet
After creating a wallet, where do the test Bits come from? The answer is from various "Faucet" websites. You can search for "bitcoin <your chosen testnet> faucet" on a search engine.
Please note that regardless of what kind of Faucet website you use, you should not submit any information other than your testnet wallet address, nor should you be induced to click on other content or download other software.
Here are two Faucet websites:
- testnet4:
- signet:
After obtaining the test Bits, a good habit is to send the test Bits back to the Faucet after the test is completed. For example, the testnet4 Faucet website provides a return address.
Run a Testnet Node Locally
In addition to using the public testnet, you can also run a testnet node yourself, which will give you more testing freedom.
This section assumes that the reader wants to run a Bitcoin Core on a Windows system and then synchronize the testnet Blockchain.
Download the Appropriate Bitcoin Core Version
First, you need to find and download the appropriate version of the software on the Bitcoin Core release page. The newer versions of Bitcoin Core can all synchronize signet, but if you want to synchronize testnet4, you must use a version after 28.0.
The binary files executable on different operating systems can be downloaded from websites in the following form, please pay attention to the release notes for each version:
https://bitcoincore.org/bin/<bitcoin core version>/If you want to download Bitcoin Core 28.1, you need to open this website: https://bitcoincore.org/bin/bitcoin-core-28.1/.
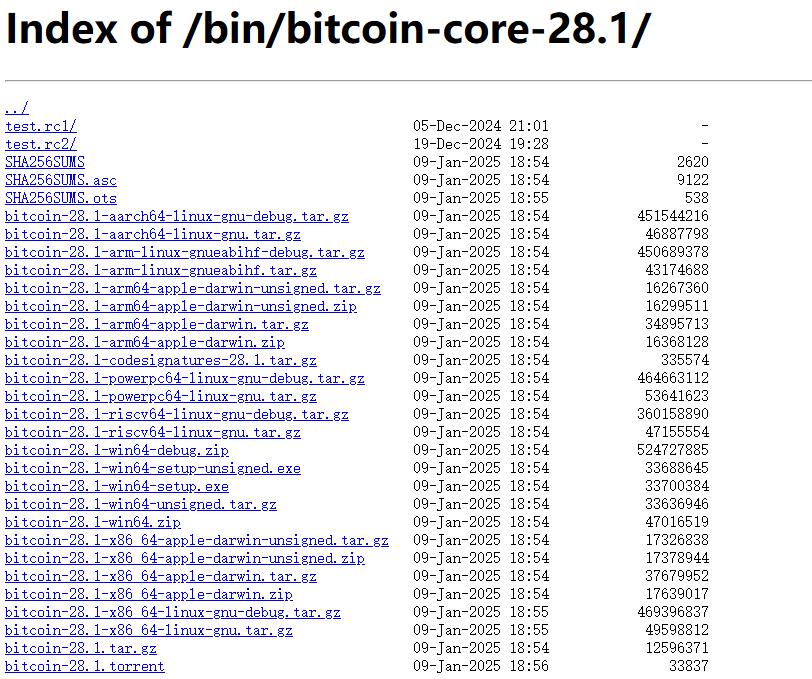
Here, the files starting with bitcoin-28.1 are compressed packages/binary files that can run on various operating systems and CPU instruction sets. Assuming you are on a Windows system (and it's 64-bit), you can choose an installation file with the win64 character. If you are used to using an interface with an operation window, you can choose .exe, otherwise .zip may be more convenient. In the following, we assume that .zip will be used for installation (and running in the command line window).
In addition to the installation file, there are two other critical files here, one is SHA256SUMS, and the other is SHA256SUMS.asc; the former contains the hash values of the installation files below, and the latter is a cryptographic signature by some developers on the former. These two constitute the means by which users can verify for themselves that the downloaded software is indeed written by the developers and has not been tampered with.
After you have downloaded the installation package, be sure to also download these two files, and never forget to verify the cryptographic signature here!
Assuming you are on a Windows system,
In the location where the installation package is stored, hold down the "Shift" key on the keyboard, right-click with the mouse to open the "Terminal" or "Powershell", and then enter the following command to get the SHA256 hash value of the installation file:
Get-Filehash .\<name of the installation file>(Tip: After entering the beginning of the installation file name, press the "Tab" key on the keyboard to automatically complete the name.)
Then, please open the SHA256SUMS file with Notepad and check whether the hash value is in it and corresponds to the installation file you downloaded.
- If it does not match, do not use this installation file!
Then, use the GPG command to verify that SHA256SUMS.asc contains the public key of the developer you know to cryptographically sign the SHA256SUMS file:
gpg --verify ./SHA256SUMS.asc- Note that the prerequisite for verification is that you have already obtained the public keys of some developers. You can find them on this page: https://github.com/bitcoin-core/guix.sigs/tree/main/builder-keys. After saving the
.gpgfiles in a location, you can open a terminal in that location and usegpg --import ./<public key file name>to import the public key for the gpg verification program. - If the verification is successful, the output information will include a statement like "Good signature".
- If the verification is not successful, do not use the installation file you downloaded!
Other Preparations
After extracting the files (i.e., the executable Bitcoin Core program files) from the
.zip, you need to set thebinlocation under that directory as an "environment variable".- In the Windows search box, search for "edit environment variables", click "Environment Variables (N)..." in the pop-up window, double-click "Path" in the "... user variables" row, then select "New" and enter
<Bitcoin Core program location>/bin, then click "OK" to save.
- In the Windows search box, search for "edit environment variables", click "Environment Variables (N)..." in the pop-up window, double-click "Path" in the "... user variables" row, then select "New" and enter
Create a file named "bitcoin.conf" and enter the following content:
signet=1server=1datadir=<a location where you want to store the blockchain data>This will have your node synchronize with the signet. If you are trying to synchronize with testnet 4, you would write it like this:
testnet4=1server=1datadir=<a location where you want to store the blockchain data, such as D:\bitcoin-blockchian>This file is what we commonly call the configuration file.
Store the above file in the following directory:
C:\Users\<your username>\AppData\Roaming\BitcoinIt must be stored in this directory.
After completing the above preparations, you can open a terminal anywhere and then enter bitcoind. After pressing Enter, your node will start and begin synchronizing the testnet. Note that closing the terminal window will cause Bitcoin Core to stop running; if you need to stop running, it is recommended to use the bitcoin-cli stop command first, and then close the relevant window.
You can also enter bitcoin-qt, which will open a more intuitive operation window, and it is also easier to close.
Users who have completed the installation with .exe can also follow a similar configuration process.
Use Sparrow to Connect to Bitcoin Core
As mentioned in the previous chapter, Sparrow allows manual configuration of the server. Among the three optional server types, "Bitcoin Core" refers to the local node.
You need to manually enter some parameters to ensure that Sparrow connects properly.
- In the first field of "URL", enter
127.0.0.1; in the second field, enter38332(signet) or48332(testnet4). - In the first field of "Data Folder", enter the value you set for
datadirin the configuration file (in the example above, it wasD:\bitcoin-blockchian) - In "Authentication", select "Default"
- If you set "rpcuser" and "rpcpassword" in the configuration file, you need to select "User/Pass" and enter the corresponding values.
After entering the information, you can click "Test Connection" to test whether the connection is successful. If the connection is successful, you can start testing the hardware signer.
Other wallet software that supports manual server configuration can also use a similar process to connect.
(End)