
Starting today, it will no longer be cold, hard code, but your personal AI intern, available 24/7!
Article author and source: Draco, currently on VibeCoding
OpenClaw V3 Beginner's Guide 🚀
✨ A note before we begin:
This is a concise and streamlined "nanny-level" beginner's guide specially designed for you.
We've eliminated the low-level configuration and deployment logic that you don't need to understand in the early stages, providing you with the smoothest learning curve (Sweet Spot):
From zero experience -> Obtaining the API -> Successful installation -> Integrating with Lark -> Security and leak prevention -> Learning to use the skills
Ready? Fasten your seatbelts, we're about to depart!
Part 1: Unveiling the Mystery (What exactly is OpenClaw?)
🎯Chapter Objective : After completing this chapter, you will be able to clearly explain to your friends what OpenClaw is, what it can do, and what it cannot do.
⏱️Estimated time : 3 minutes
What you will learn in this chapter
• Explain to a friend in one sentence what OpenClaw is.
• Three real-world scenarios to understand what it can do for you
• Clarify common misconceptions and know what it cannot do.
Why did it suddenly become popular in 2026?
• Choose the reading path that best suits your needs.
1.1 In short: Your AI assistant lives inside your computer.
Imagine this: You hire an intern who is exceptionally smart, able to help you research, write documents, organize data, and is available 24/7. But you don't need to pay social security for them, nor do you have to worry about them leaving.
OpenClaw is this intern, except it lives on your computer .
More accurately:
OpenClaw is an AI agent platform that allows you to run an AI assistant on your computer and integrate it into the tools you use every day—such as Lark and Telegram.
Let's familiarize ourselves with a few core concepts first (they will be discussed in detail in later chapters):
• Agent: An AI program capable of autonomously performing tasks, like an intern with a toolbox. You tell it, "Help me organize today's meeting minutes," and it will decide for itself what tools to use and how many steps to complete the task.
• Gateway: The system's central control room, responsible for message routing and coordination. The default address is 127.0.0.1:18789, which is a port opened on your computer.
• Channel: An interface that connects to various chat platforms, such as Lark and Telegram.
• Tool: The specific functions that the Agent can invoke, such as reading and writing files, executing commands, and searching web pages.
• Skill: The "instruction manual" that tells the agent when to use which tool.
Don't panic. These words may seem unfamiliar now, but you'll get used to them after using them a few times.
1.2 What can it do: Three real-world scenarios
Talking about concepts is too abstract, so let's look at three real-world use cases.
1.2.1 Scenario 1: Automatically compile daily reports (saving the working class)
Xiao Wang has to submit a daily report before leaving get off work each day, summarizing what he did that day. Before, he would spend at least 20 minutes going through chat history, checking emails, and recalling the day's work.
Now he's tagging the OpenClaw robot on Lark:
"Help me compile today's daily report, extract key progress from the project portfolio, and extract follow-up items from emails."
Robot Autonomy:
1. Read today's messages from a specified group chat.
2. Extract key information
3. Generate daily reports according to the specified format.
4. Send to the specified document
With the 20 minutes saved, Xiao Wang can leave work on time.
1.2.2 Scenario 2: Researching and Writing Reports (A Boon for Researchers)
Xiao Li needs to write an industry analysis report, which involves a lot of data collection. In the past, he had to switch back and forth between more than a dozen websites, copying and pasting until his hands were sore.
Now he tells OpenClaw:
"Search for the market size of AI programming assistants in 2025, compile the data into a table, and include the data sources."
Automatic Agent:
1. Use a search tool to find information.
2. Access multiple web pages to extract information
3. Organize into a structured table
4. Label the data source
Freed from the "physical labor," Xiao Li could focus on analysis and judgment.
1.2.3 Scenario 3: Using Lark to get things done (a team collaboration tool)
People often ask in the team group:
• "Can anyone check last month's sales data?"
• Please help translate this English document.
• Convert this PDF to Markdown
Now, just @ the bot in the group:
"@Assistant, please convert the PDF you just sent to Markdown format."
The robot processes the request immediately and sends the results back to the group.
No need to bother colleagues, no need to switch tools, you can get things done in the chat.
1.3 What it is not: Clarifying common misconceptions
OpenClaw is powerful, but it's not a panacea. The following misconceptions should be clarified as soon as possible.
1.3.1 Misconception 1: It is a replacement for ChatGPT
no.
ChatGPT is an AI conversational product that lets you chat simply by opening a webpage. OpenClaw is a platform that allows you to build your own AI assistant.
You can understand it this way:
• ChatGPT = A well-trained customer service representative
• OpenClaw = A system that can train its own customer service team
In fact, OpenClaw can access ChatGPT's API, as well as other models such as Claude, KIMI, and MiniMax. It is a user of models, not a competitor to them.
1.3.2 Misconception 2: It is a cloud service, and the data is stored on someone else's server.
no .
This is one of OpenClaw's biggest features: it runs on your computer .
• Your chat history is stored locally.
• Your file processing is done locally.
• Your API Key will not pass through a third-party server.
This is a huge advantage for businesses and individuals concerned about data privacy.
⚠️ Note: Although OpenClaw runs locally, it requires an internet connection to access AI models. Your messages will be sent to the corresponding AI service provider (such as OpenAI, KIMI, etc.).
1.3.3 Misconception 3: It will randomly buy things online and send random emails.
Won't.
OpenClaw is designed based on the principle of least privilege. By default, it can do nothing.
Want it to read and write files? You need to grant explicit authorization.
Want it to send emails? You need to configure the email tool.
Want it to execute commands? You need to enable the sandbox and set permissions.
Moreover, high-risk operations can be configured with secondary confirmation to ensure they do not "act on their own".
1.4 Why did it suddenly become popular in 2026?
The concept of AI Agents didn't just emerge in 2026, so why is it only becoming popular now?
1.4.1 Reason 1: The capabilities of large models have reached the "usable" threshold.
While GPT-4 and Claude 3 in 2024 were already powerful, they were not stable enough. The models in 2025-2026 (Claude Opus 4.6/Sonnet 4.6, GPT-5.3-Codex, KIMI K2.5, etc.) made a qualitative leap in understanding complex instructions and stable output formats.
Simply put: previous AI assistants often "couldn't understand human speech," but the current ones can.
1.4.2 Reason Two: Engineering tools have matured.
Having a clever brain alone is not enough; you also need:
• Stable message sending and receiving mechanism
• Reliable tool calling framework
• Secure access control system
• User-friendly configuration interface
OpenClaw has solved these engineering challenges, allowing ordinary users to build their own AI assistants.
1.4.3 Reason Three: The Shift from "Toy" to "Tool"
Early AI agents were more like toys for geeks, but now they can actually solve real-world work problems.
• Save 20 minutes by organizing daily reports
• Save 2 hours on research and report writing
• Automated data processing saves half a day
When the time saved exceeds the learning cost, widespread adoption will naturally follow.
1.5 Reading Roadmap: Shortest Paths for Three Types of Readers
This book has 17 chapters, but you don't need to read it all. Choose the path that best suits your needs:
1.5.1 Path A: I just want to get started quickly (I recommend everyone take this route first)
Goal: Tag an AI robot on Lark and have it do things for you.
Reading order:
1. Chapter 1 (This Chapter) → Understanding What It Is
2. Chapter 2 → Preparing the API Key
3. Chapter 3 → Installing OpenClaw
4. Chapter 5 → Accessing Lark
5. Chapter 6 → Configuring Security Policies
Estimated time : 2-3 hours
1.5.2 Path B: I want to deeply customize it to perform specific tasks.
Goal: To have an AI assistant complete my specific tasks (such as data analysis and report generation).
Reading order:
1. Complete path A first (a solid foundation is essential).
2. Chapter 10 → Understanding what Tools can do
3. Chapter 11 → Using Existing Skills
4. Chapter 12 → Writing your first skill
5. Chapter 13 → Advanced Optimization
Estimated time : 1-2 days
1.5.3 Path C: I am a technical user and want to deploy to the server.
Objective: To run stably on the server and be shared by the team.
Reading order:
1. Complete path A first (understand the basics)
2. Chapter 7 → Model Configuration Optimization
3. Chapter 8 → In-depth Analysis of Configuration Files
4. Chapter 9 → Security and Sandbox
5. Chapter 15 → Multiple Workspace Configurations
6. Chapter 16 → Deployment and Operation
Estimated time : 2-3 days
Summary of this section
Let's review:
1. What is OpenClaw: An AI agent platform that lets you run AI assistants on your computer.
2. What it can do: Compile daily reports, research and write reports, and @ it in Lark (a Chinese instant messaging platform) to handle tasks.
3. What it cannot do: It is not a ChatGPT replacement, it is not a pure cloud service, and it will not act on its own.
4. Why it's popular now: Mature large-scale modeling capabilities + comprehensive engineering tools + truly solves real-world problems.
5. How to get started: Choose path A, B, or C based on your needs.
Try it yourself
1. Explain what OpenClaw is to a friend, using the analogy of the "intern with a toolbox" from this chapter.
2. Think about it: What repetitive tasks in your daily work might be suitable for being handed over to an AI assistant?
3. Based on the route map in Section 1.5, determine which path you want to take.
Part Two: Preparing for Start-up (You Only Need These Three Things)
🎯 Chapter Objective: After completing this chapter, you will be able to confirm that you have all the necessary conditions to begin and have prepared your API Key.
⏱️ Estimated time: 10 minutes
What you will learn in this chapter
• Ensure your computer meets the operating requirements.
• Understand what an API Key is and how to obtain it.
• Detailed application steps for three domestic coding plans (KIMI/MiniMax/GLM)
• Alternative solutions (OpenRouter/Anthropic)
• Preview the final result
2.1 Don't panic, you only need these three things.
Many technical books start by listing a bunch of requirements, making readers want to give up. Let's try a different approach:
You only need three things :
1. A computer with internet access (Windows/Mac/Linux are all acceptable)
2. An API Key (Don't be intimidated by this term, it's just a password).
3. Ten minutes (and a little patience)
That's it. You don't need to be a programmer, you don't need to understand AI, and you don't need to buy servers.
2.2 The first thing: a computer
2.2.1 System Requirements
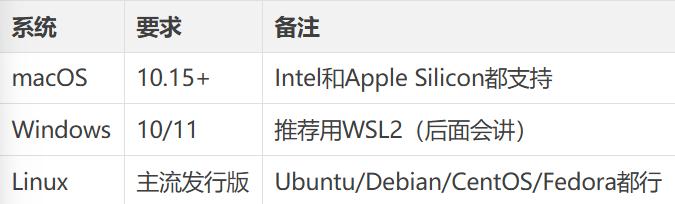
Simply put: it can run on most computers that are within the last 5 years.
2.2.2 Network Requirements
You need to have access to:
• npm registry (install OpenClaw)
• Your chosen AI service provider (such as KIMI, MiniMax, etc.)
Note to users in China: OpenClaw itself does not require a VPN, but some AI service providers may.
2.3 The second thing: an API Key
2.3.1 What is an API Key?
API Key (Application Programming Interface Key) sounds sophisticated, but it's actually just a string of passwords.
To draw an analogy:
• Hotel VIP card → Proof that you are eligible for services
• Community access card → Proves you have permission to enter
• API Key → Proves you have permission to access AI services
Every time OpenClaw uses AI to do something for you, you need to present this key. The AI service provider uses this key to:
1. Confirm who you are
2. Calculate how much of your credit limit you used.
3. Decide whether to respond to your request.
2.3.2 Three domestic coding plans (recommended)
For users in China, I recommend prioritizing the following three providers. They all have coding plans specifically for developers, and this chapter will consistently use the Chinese website's terminology (excluding international websites).
2.3.2.1 Option A: KIMI Coding Plan (Recommended)
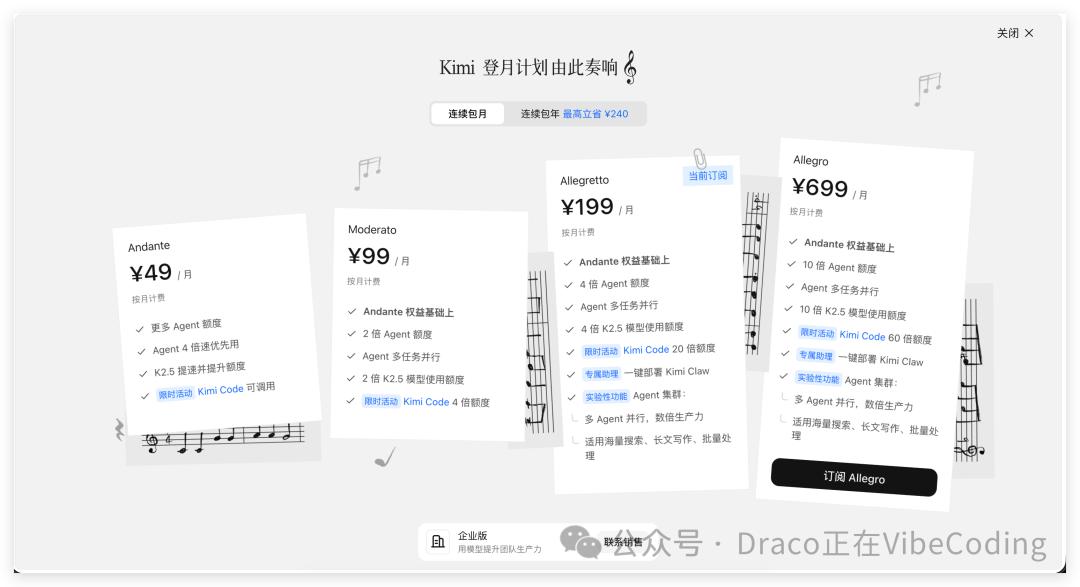
5pMQBY
Application steps :
1. Visit https://www.kimi.com/code
2. Log in/register a KIMI account
3. Click "Subscribe to Coding Plan"
4. Complete payment (Alipay/WeChat supported)
5. Access the console and click "Create API Key".
6. Copy the generated key (starting with sk-).
💡 Note: The key is only displayed once after creation, so please save it carefully. If you lose it, you will have to recreate it.
2.3.2.2 Option B: MiniMax Coding Plan (Recommended)
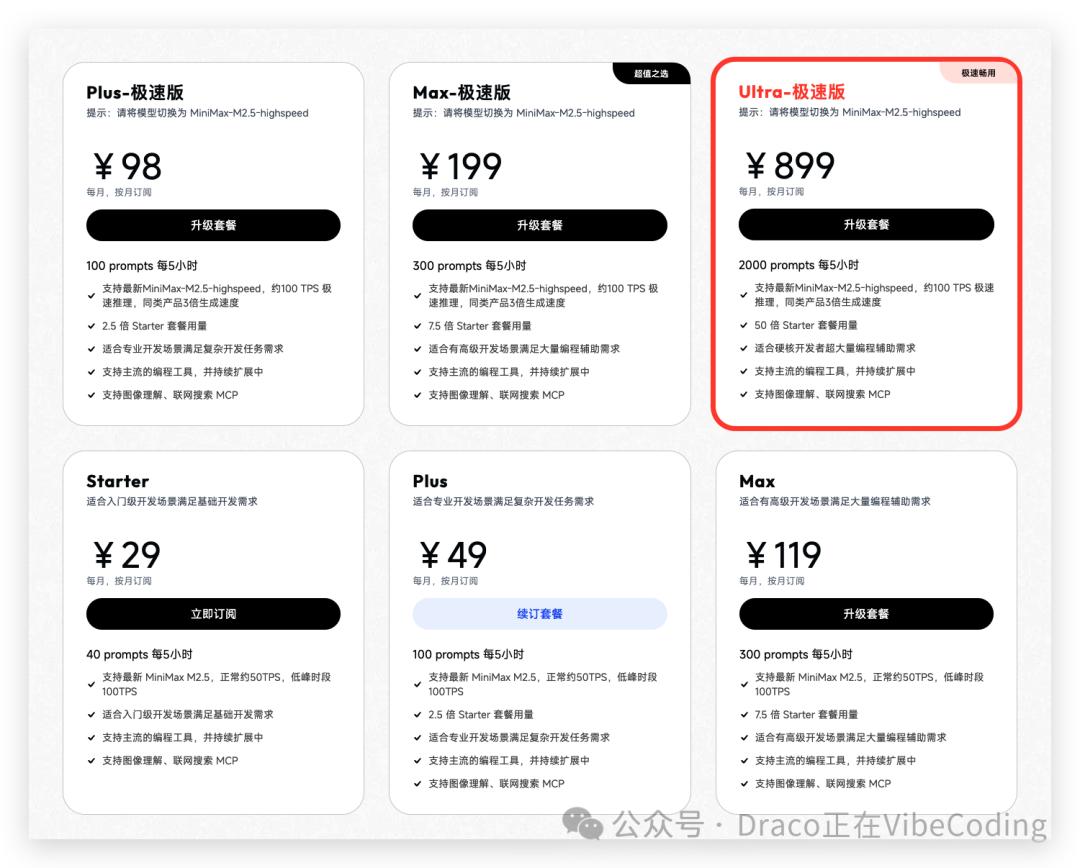
Cu5XmF
Application steps :
1. Visit https://platform.minimaxi.com/subscribe/coding-plan
2. Register/Log in to an account
3. Complete real-name authentication (ID card required)
4. Subscribe to a Coding Plan
5. Access the "API Management" page
6. Create an API Key and copy it.
2.3.2.3 Option C: GLM Coding Plan (Recommended)
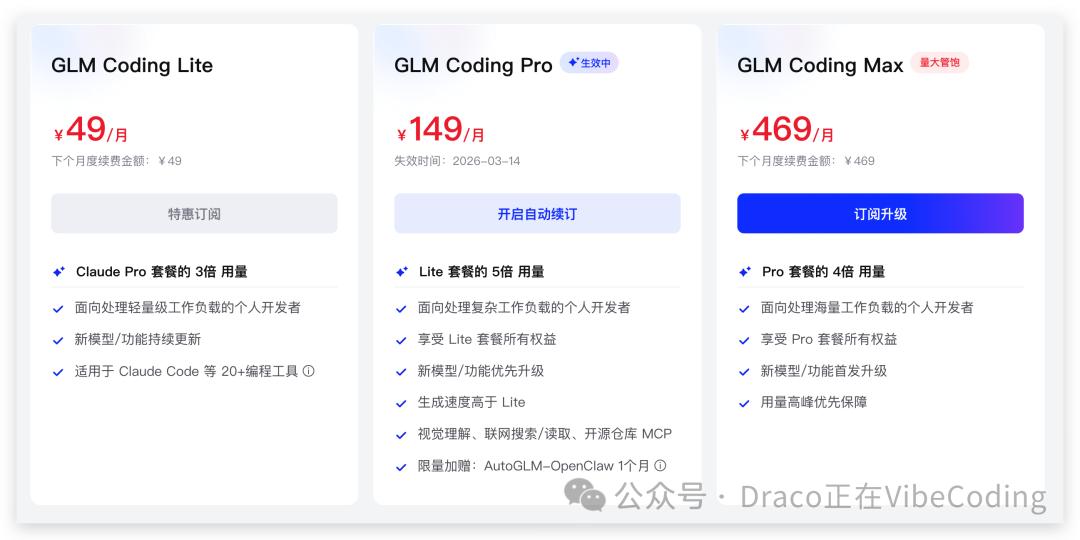
WUTpwh
Application steps :
1. Visit https://bigmodel.cn/glm-coding
2. Register/login to Zhipu AI account
3. Access the console
4. Click the "API Keys" menu.
5. Create a new API Key
6. Copy and save
2.3.3 Comparison Table of Three Companies

💡 Note: The prices above are based on the prices recorded on the checkout page of the three major domestic retailers; please refer to the real-time page for any changes to the promotion.
2.3.4 Alternative Solutions
If none of the above three companies suit you, you have the following options:
2.3.4.1 OpenRouter
Features: One API connects to multiple models (Claude, GPT, Llama, etc.)
Website: https://openrouter.ai
Suitable for: Users who want to use a single key to access multiple models
Note: Accessing from within China may require a proxy.
2.3.4.2 Anthropic (Claude Official)
Features: Official API for Claude models, top-quality
Website: https://console.anthropic.com
Suitable for: Users who seek the highest quality responses
Note: Accessing from within China requires a proxy and is expensive.
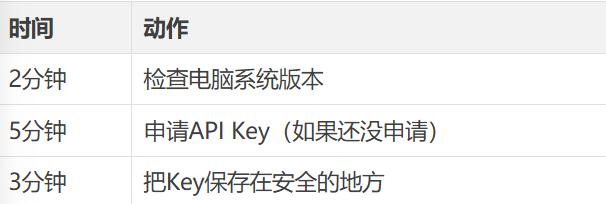
2.4 The third thing: 10 minutes
What are you going to do in these 10 minutes?
Suggestions for saving the key:
1. Do not save directly in WeChat/QQ chat history
2. Do not save screenshots to your photo album.
3. Recommended storage location:
• Password managers (1Password, Bitwarden, etc.)
• Local text files (stored in a safe location)
• Memo (if encryption is supported)
⚠️ Important: Your API Key is like your bank card PIN; if it's leaked, someone can spend your money. Keep it safe!
2.5 See in advance what you will get
After completing this book, you will have:
An AI robot that can be @mentioned in Lark:
• Ask it a private message
• @It in the group to get things done
• Let it help you organize documents and search for information
A customizable AI assistant:
• Write Skills according to your needs
• Connect your frequently used tools
• Automating repetitive tasks
Complete control over data privacy:
• All data is stored locally.
• Without going through a third-party server
Enterprise-level security
Summary of this section
Come on, check your preparation checklist:
• A computer with internet access (Windows/Mac/Linux)
• One API Key (choose one from KIMI/MiniMax/GLM)
• 10 minutes
If everything is ready
Try it yourself
1. Confirm that your computer system version meets the requirements.
2. Choose a coding plan and complete the API Key application.
3. Store the key in a safe place (a password manager is recommended).
4. Test Network: Access the console of your chosen AI service provider to confirm that it can be opened normally.
Part Three: Lightning-Fast Installation (Bring your mythical beast home in 5 minutes)
🎯 Chapter Objective: After completing this chapter, you will be able to install OpenClaw and send your first message.
⏱️ Estimated time: 5 minutes
📋 Prerequisites: Chapter 2 (Preparatory Work) has been completed.
What you will learn in this chapter
• Check and install the Node.js environment
• Install OpenClaw with a single command
• Run the wizard to complete the initial configuration.
• Understand the difference between QuickStart and Manual
• Configure three domestic coding plans
• Verify successful installation and send the first message.
3.1 Environment Check: What is Node.js?
3.1.1 Introduction to Node.js
Node.js is an environment that allows JavaScript to run locally on a computer. Simply put:
Node.js acts like a "translator" for JavaScript, enabling it to work outside of the browser.
You don't need to understand it in detail; just make sure it's installed on your computer.
3.1.2 Check Node.js version
Open your terminal and type:
node --version
Expected results:
v22.xx
Judgment criteria:
• ✅ Version >= v22: Can continue
• ❌ Version
• ❌ "command not found" message: Installation required.
3.1.3 If Node.js does not meet the requirements
macOS installation/upgrade
# Install using Homebrew (recommended) `brew install node` # If already installed but the version is outdated, upgrade `brew upgrade node`
Windows installation/upgrade
Recommended method: Use winget
winget install OpenJS.NodeJS.LTS
Or download manually:
1. Visit https://nodejs.org
2. Download the LTS version (Long Term Support version).
3. Follow the wizard to install.
💡 Note for Windows users: The official recommendation is to run OpenClaw in WSL2 to avoid many strange issues. WSL2 installation guide: https://docs.microsoft.com/zh-cn/windows/wsl/install
Linux installation/upgrade
Ubuntu/Debian:
curl -fsSL https://deb.nodesource.com/setup_22.x | sudo -E bash -sudo apt-get install -y nodejs
CentOS/RHEL/Fedora:
sudo dnf install nodejs
3.1.4 Verify Installation
After installation, check again:
node --version npm --version
Both commands should return a version number.
⚠️ Frequently Asked Questions: If you still receive the "command not found" message after installation, try restarting your terminal or logging back into your system.
3.2 Installation command: Just one line, copy and paste.
After confirming that Node.js >= v22, execute the installation command:
npm install -g openclaw@latest
What is this command doing?
• npm: Node.js package manager
• install: Install
• -g: Global installation (openclaw command can be used in any directory)
• openclaw@latest: Install the current release from npm (the verification freeze point for this book is v2026.2.17).
Waiting time: depends on your network, usually 30 seconds to 2 minutes.
3.2.1 Verify successful installation
openclaw --version
Expect to see output similar to:
February 17, 2026
❌ If you receive the message "command not found"
Possible cause: The npm global path is not added to the system PATH.
Solution:
1. Restart the terminal
2. If that still doesn't work, check the global npm path: npm prefix -g
3. Add the returned path to the PATH environment variable.
3.3 Run Wizard: OpenClaw Onboard
After installation, run the initialization wizard:
openclaw onboard --install-daemon
Parameter description:
• onboard: Run the initialization wizard
• --install-daemon: Installs the background service as well (recommended)
3.3.1 First step of the wizard: Risk identification + existing configuration handling
After starting the wizard, you will usually see the following:
? I understand this is powerful and inherently risky. Continue?❯ Yes No
Select Yes to continue.
If you have previously installed OpenClaw, you will also see:
Existing config detected...? Config handling❯ Use existing values Update values Reset
How to choose:
• First installation: This section usually won't appear; proceed directly to the next step.
• Reinstall/replace model: Select Update values (recommended, keep other stable configurations).
• Start over completely: Select Reset (caution).
3.3.2 Step Two of the Wizard: Selecting the Onboarding Mode
The guide will ask you:
? Onboarding mode❯ QuickStart - Minimal setup, get running fast Manual - Full control over all settings
How to choose?
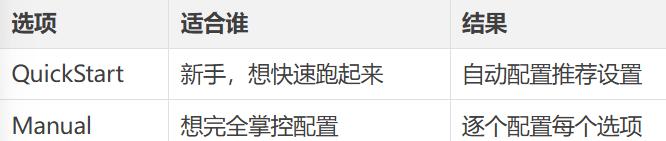
My suggestion: Choose QuickStart the first time, and you can change the configuration at any time later.
3.3.3 Step 3 of the wizard: First, select the model provider.
The wizard will prompt you to select a model provider:
? Which model provider would you like to use? OpenAI Anthropic❯ KIMI MiniMax GLM Other (custom endpoint)
First, select the manufacturer you applied for in Chapter 2 (KIMI / MiniMax / GLM).
3.3.4 Fourth step of the wizard: Select the authentication method again (Auth method, easily overlooked)
After you select a vendor, you are usually not asked for a key immediately. Instead, you will first be asked to select the authentication method of that vendor.
You'll often see something like this:
? auth method❯ Coding Plan / OAuth API Key
Domestic readers are advised to prioritize the option corresponding to the Coding Plan.
• KIMI: Prioritize Kimi Code API key (subscription) path
• MiniMax: Prioritize the MiniMax OAuth (CN) path
• GLM (Z.AI): Preferred Coding-Plan-CN path
3.3.5 Step 5 of the wizard: Enter the API Key and select the model.
If you choose KIMI
Enter your KIMI API Key: [Paste your Key] Select model: ❯ kimi-k2.5
If you choose MiniMax
Enter your MiniMax API Key: [Paste your Key] Select model: ❯ MiniMax-M2.5
If you choose GLM
Enter your GLM API Key: [Paste your Key] Select model: ❯ glm-5
💡 Note: When pasting the API Key, the terminal will not display any characters (for security reasons), which is normal. Just paste and press Enter.
3.3.6 Wizard Step Six: Configure the Channel (Skip first!)
Under the QuickStart path, the wizard will directly take you to the channel selection list:
? Select channel (QuickStart) ... Feishu/Lark (Feishu) ...❯ Skip for now (You can add channels later via `openclaw channels add`)
For first-time users, we recommend selecting "Skip for now".
Why Skip First?
This is the best practice verified through multiple rounds of real-world testing:
1. First, make sure that "stable dialogue is possible in TUI" is working.
2. Confirmed that the model, authentication, and gateway are all functioning correctly.
3. When reconnecting to a channel, if an error occurs, it can be clearly determined whether it is a "channel configuration issue" or a "basic environment issue".
Don't worry, Chapter 5 will explain Lark integration in detail.
3.3.7 Step 7 of the wizard: Configure Skills (Recommended)
After the Channel, the wizard will proceed to Skills check and optional installation:
Skills statusEligible: ...Missing requirements: ...? Configure skills now? (recommended)❯ Yes No
The initial recommendation is to select Yes, for a simple reason:
Install the dependencies that can be installed automatically now to avoid pitfalls later.
What you will often see next is:
? Install missing skill dependencies❯ Skip for now ? Preferred node manager for skill installs❯ npm pnpm bun
Default advice for beginners:
1. If you only want to complete the main storyline first: you can skip to now;
2. If you plan to play Skills immediately: Select the installation options as needed;
3. Select the node manager that you are already using on your local machine (if you are unsure, use npm).
3.3.8 Step 8 of the wizard: Configure Hooks (Minimum configuration recommended)
After Skills, you will enter the Hooks configuration:
Hooks...? Enable hooks?❯ Skip for now
According to the official documentation, Hooks are used to "automatically perform actions when certain commands are triggered" (e.g., performing session memory cleanup when /new is executed).
The minimal strategy recommended in this book:
1. Initially, you can enable one core hook (minimum available, prioritizing session-memory, if it is in the list).
2. If you are still unsure about the function of a hook, you can skip this for now;
3. First, get the main storyline running smoothly, and then systematically manage the hooks in Chapter 10.
3.3.9 Step 9 of the wizard: Select the Hatch method (critical)
In the final stage, the wizard will give you a starting point option:
? How do you want to hatch your bot?❯ Hatch in TUI (recommended) Open the Web UI Do this later
How to choose:
• Hatch in TUI (recommended): Directly enter the interactive mode in the terminal (most stable, recommended as the default).
• Open the Web UI: Open the browser console (graphical).
• Do this later: End the guide first, then enter later.
Why is TUI selected by default?
1. We cannot assume that you are operating on your local machine; many readers are running it on a cloud server/VPS.
2. If it's a VPS, Open the Web UI often requires port forwarding, which is not user-friendly for beginners.
3. Selecting Hatch in TUI will allow you to start the conversation immediately without being blocked by network or port issues.
3.3.10 Step 10 of the wizard: Record the Dashboard link and Gateway status
After you complete the Hatch selection, the wizard will output console access information and gateway status (such as Web UI, Gateway WS, Gateway: reachable).
If you select "Open the Web UI", you will usually be given a Dashboard link with a token and the browser will be opened automatically.
If you selected "Do this later", the following will be available:
openclaw dashboard --no-open
Retrieve the console entry point again.
3.4 Initial Conversation: First, complete the bootstrap (actual initialization).
After completing the onboard, it is recommended to complete the first round of bootstrap dialogue in TUI.
The official process treats it as a key action to "turn the Agent into your Agent" (the source code includes the "Wake up, my friend!" guide).
This step suggests that you proactively clarify the following 5 things:
1. Who you are: how to address you, your time zone, and your working language.
2. What role do you want it to play: for example, "my technical writing assistant".
3. Your usual work environment: commonly used tools, file directories, and communication methods (Lark/email, etc.).
4. Your preferences: answer style, length, whether to give the conclusion first.
5. Your boundaries: Which operations must be confirmed first, and which content should not be touched.
The clearer this step is, the more it will resemble "your own instance" rather than "a generic chatbot."
💡 You can also save this information to BOOTSTRAP.md / IDENTITY.md / USER.md / SOUL.md in the workspace to make subsequent sessions more stable.
After using Bootstrap 3.5, send the first "low-context" message.
After completing the bootstrap, it is recommended to first send a smoke test message that is not related to your work background.
I recommend you use this one first:
Please provide me with a list of 5 tasks that I can do today (each task should not exceed 18 characters), ordered by priority.
If you want to test "search capabilities", you can add another test:
Please tell me the weather in Beijing today and give me some clothing advice (in one sentence).
Press Enter to send.
Expected response:
It should provide structured results directly (lists or weather recommendations) instead of continuing with vague self-introductions.
If you see a reply, congratulations! Installation successful!
3.6 What if an error occurs?
3.6.1 Problem 1: Gateway startup failed
Symptom: The wizard indicates that Gateway failed to start.
Possible reasons:
1. Port 18789 is in use.
2. Insufficient permissions
3. Configuration file error
Solution:
# Check port usage: lsof -i :18789 # Or start OpenClaw gateway on a different port: start --port 18790
3.6.2 Problem 2: No reply to sent messages
Symptom: After sending a message, it keeps showing "typing" but there is no reply.
Possible reasons:
1. API Key Error
2. Network outage
3. Model service error
Solution:
# Check configuration: openclaw config get # Check model connection: openclaw doctor # View logs: openclaw logs
3.6.3 Problem 3: Web UI cannot be opened
Symptom: When accessing 127.0.0.1:18789, the browser displays "Unable to connect".
Possible reasons:
1. Gateway not started
2. Firewall blocking
3. Incorrect address entered
Solution:
# Verify that Gateway is running OpenClaw status # If not running, manually start OpenClaw gateway start
Summary of this section
Let's review today's achievements:
1. ✅ Node.js environment checked (>= v22)
2. ✅ OpenClaw is installed (npm install -g openclaw@latest)
3. ✅ The initialization wizard (openclaw onboard --install-daemon) was run.
4. ✅ Includes a domestic Coding Plan (KIMI/MiniMax/GLM)
5. ✅ In the final stage, Hatch in TUI (recommended) was selected (default recommendation).
6. ✅ First bootstrap completed (initializing the instance to "your instance")
7. ✅ The first business message has been sent!
Try it yourself
1. Continue the conversation in TUI, adding details about your work boundaries, preferences, and no-go zones (complete the bootstrap).
2. Let it generate an actionable list based on your real-world scenario (e.g., today's to-do list).
3. If you are using your local machine, please open the Dashboard/Web UI again to experience the difference.
4. If you encounter problems during installation, record the error messages and troubleshoot according to Chapter 4.
Part Four: Lark Integration (Let it chat with you in groups)
🎯 Chapter Objective: After completing this chapter, you will be able to @ an AI robot in Lark and have it do things for you.
⏱️ Estimated time: 30 minutes
📋 Prerequisites: Chapter 3 has been completed (successful installation and completion of the first round of Bootstrap dialogue in TUI).
What you will learn in this chapter
• Create enterprise applications on the Lark Open Platform
• Obtain App ID and App Secret
• Configure permissions (including batch importing JSON)
• Understand the key timing sequence of "deploy first → configure later → open persistent connection later".
• Configure Lark channel on the OpenClaw side
• Complete pairing and verify send/receive.
5.1 Why Chapter 3 asked you to Skip the Channel first?
Remember the configuration wizard in Chapter 3? We selected Skip in the Channel step.
This is not an omission, but a deliberate choice.
Practical experience tells us:
• First, ensure that "stable dialogue is possible in TUI" to confirm that the model, authentication, and Gateway are all functioning correctly.
• When re-integrating channels, errors can be clearly identified as either "channel configuration issues" or "basic environment issues".
This "two-stage" approach has a higher success rate and is also easier to troubleshoot.
If you have already completed Chapter 3 and finished the bootstrap initialization in TUI, this chapter is your next step.
5.2 Overall Process of Lark Integration
Regardless of which platform you're working with, they all basically follow the same workflow:
1. Build the application on the platform side (obtain the credentials)
2. Configure channels on the OpenClaw side (openclaw channels add)
3. Start Gateway and verify send and receive operations.
4. Pairing/Whitelisting for Access
5. Further refine group chat strategies, mention strategies, and risk control.
You can think of these 5 steps as "fixing the framework". This chapter will first get Lark working; for other channels, please refer to the supplementary chapters or official documentation.
5.3 Phase 1: Lark Private Chat Bot (Reducing Complexity)
This section is divided into two parts:
1. First Phase: Lark private chatbot can reliably send and receive messages.
2. Second stage: You can reply to @bots in Lark group chats.
Why divide it into two parts?
When troubleshooting, private chats are much simpler than group chats. Ensuring private chats work before setting up group chats significantly reduces complexity.
5.4 Step 1: Create an application on the Lark Open Platform
5.4.1 Open the platform and create an enterprise application
1. Open the Lark Open Platform: https://open.feishu.cn/app
2. Log in to your Lark account (enterprise administrator privileges required).
3. Click "Create Enterprise Self-Built Application"
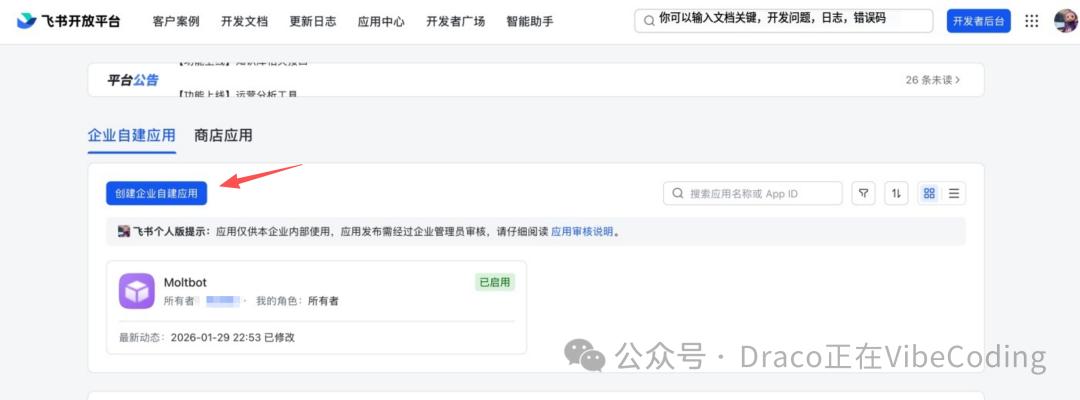
Creating Enterprise Applications
1. Fill in the application information:
• Application Name: We recommend using "AI Assistant" or "OpenClaw".
• Application Description: An internally used AI assistant
• Icon: You can upload a robot icon.
5.4.2 Obtaining App ID and App Secret
After creation, proceed to the application details page:
1. Click "Vouchers and Basic Information" on the left.
2. Record the following information:
• App ID (in the form cli_xxxxxxxxxxxxxxxx)
• App Secret (Click the "View" button to see)

Obtain credentials
⚠️ Important: Keep the App Secret confidential. Do not take screenshots or share them in groups. If leaked, others can control your bot.
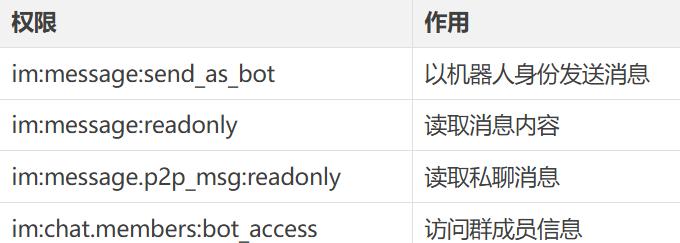
5.4.3 Permission Configuration (Batch Import)
This is the step most prone to errors, so follow along carefully.
1. Click "Permission Management" on the left.
2. Click "Batch Import Permissions"
3. Paste the following content:
{ "scopes": { "tenant": [ "aily:file:read", "aily:file:write", "application:application.app_message_stats.overview:readonly", "application:application:self_manage", "application:bot.menu:write", "contact:user.employee_id:readonly", "corehr:file:download", "event:ip_list", "im:chat.access_event.bot_p2p_chat:read", "im:chat.members:bot_access", "im:message", "im:message.group_at_msg:readonly", "im:message.p2p_msg:readonly", "im:message:readonly", "im:message:send_as_bot", "im:resource" ], "user": [ "aily:file:read", "aily:file:write", "im:chat.access_event.bot_p2p_chat:read" ] }}1. Click "OK"
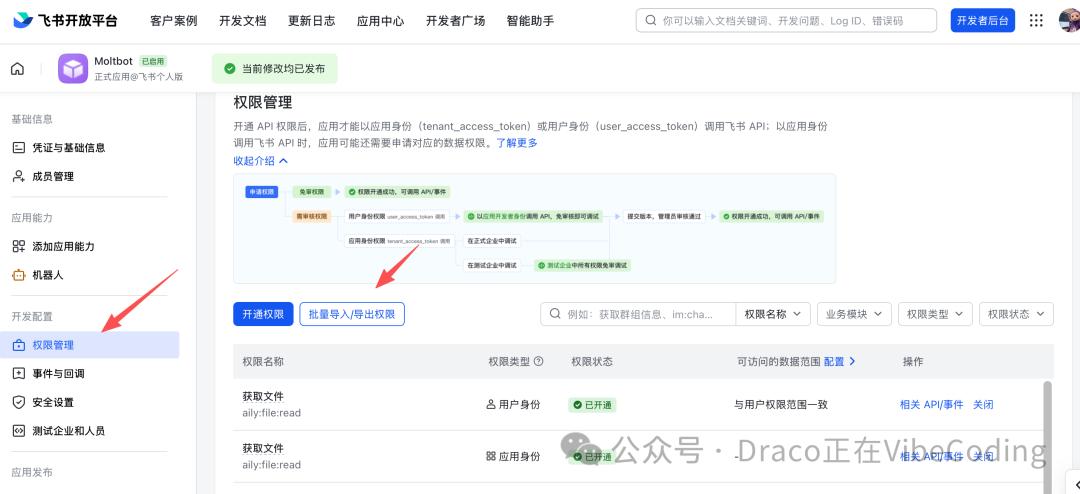
Configure permissions
What are these permissions for?
5.4.4 Enabling Bot Capabilities
1. Click "Application Capabilities" on the left.
2. Locate the "Robot" card and click "Enable".
3. Set the robot name (it is recommended to match the application name).
4. Click "Save"
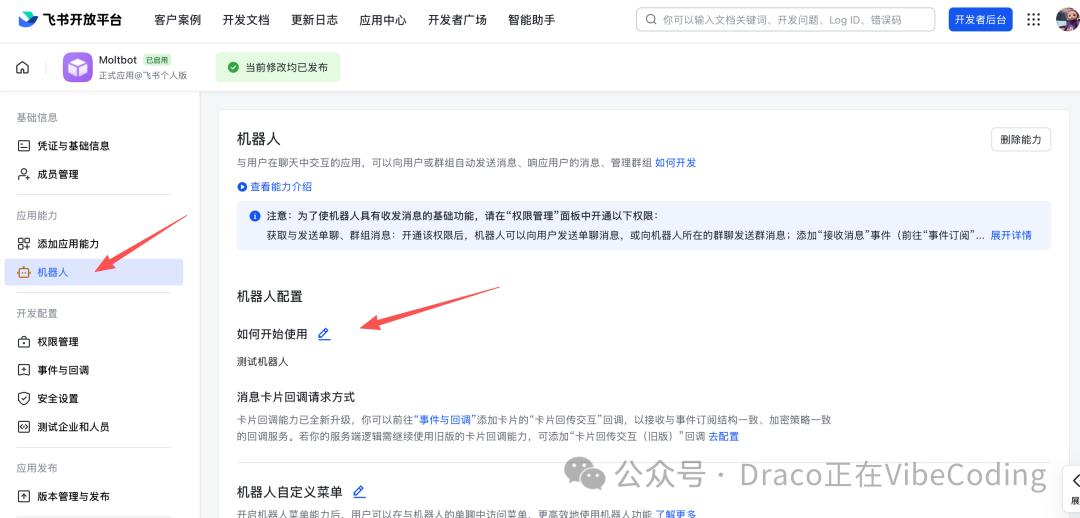
Enable Bot capabilities
5.4.5 First Application Release (⚠️ Key Step!)
Important: This step must be completed before enabling persistent connections!
Real-world testing experience: If you enable "long connection subscription" before publishing the application, it will usually fail continuously.
Release steps:
1. Click "Version Management and Release" on the left.
2. Click "Create Version"
3. Fill in the version information:
• Version number: 1.0.0
• Update Notes: Initial Version
4. Click "Save"
5. Click "Apply for Publication"
6. Wait for approval from the company administrator (if it's your own company, it's usually approved automatically).
💡 Note: Once approved, the application status will change to "Published". Only then can you proceed to the next step.
5.5 Step 2: Configure Lark in OpenClaw
5.5.1 Enable Lark Plugin
First, check the plugin list:
openclaw plugins list
If a feishu exists and its status is disabled, enable it:
openclaw plugins enable feishu
💡 Note: The official documentation also suggests installing the `openclaw plugins install @openclaw/feishu`. However, based on the practical tests in this book, enabling the built-in plugins is more stable.
5.5.2 Adding Channels Interactively
Run the command:
openclaw channels add
Follow the prompts to complete the configuration:
Question 1: Selecting the Channel Type
? Select channel type:❯ Feishu/Lark (Feishu) Telegram WebChat ...
Choose Feishu/Lark (飞书)
Question 2: Enter App ID
? Enter Feishu App ID: cli_xxxxxxxxxxxxxxxx
Paste the App ID you obtained in version 5.4.2.
Question 3: Enter App Secret
Enter Feishu App Secret: [Paste Secret]
Paste the App Secret you obtained in version 5.4.2 (it's normal that no characters are displayed when pasting).
Question 4: Choosing a Lark domain
Which Feishu domain? ❯ feishu.cn (domestic version) larksuite.com (international version)
Domestic users can choose feishu.cn
Question 5: Group Chat Strategy
Group chat policy: ❯ disabled (Group chat is disabled for now) enabled
Select "disabled" first, and then start the group chat once the private chat is open.
Question 6: Do I need a mention before I can reply?
Require mention in group chats? ❯ yes (You need to mention me in the group chat to reply) no
Select "yes" to prevent bots from talking nonsense in the group.
5.5.3 Verify Configuration
After configuration, view the Channel list:
openclaw channels list
It should display:
NAME TYPE STATUS feishu configured
5.6 Step 3: Enable event subscription (long connection)
5.6.1 Critical Timing (⚠️ A Lesson Learned in Blood)
The correct timing sequence is:
1. ✅ Lark side: Create application → Configure permissions → Publish application
2. ✅ OpenClaw side: Configure channels using the "channels add" option.
3. ✅ OpenClaw side: Launch Gateway
4. ✅ Lark side: Enable event subscription (long connection)
5. ✅ Lark side: Configure event subscription address
If the order is wrong, the long connection will fail to subscribe, which will manifest as "the message is sent, but the robot does not respond".
5.6.2 Start Gateway
OpenClaw Gateway Start
Confirmed output:
✓ Gateway started on http://127.0.0.1:18789
5.6.3 Enable event subscription on the Lark platform
1. Return to Lark Open Platform
2. Click "Events and Callbacks" on the left.
3. In "Event Subscription Method", select "Persistent Connection"
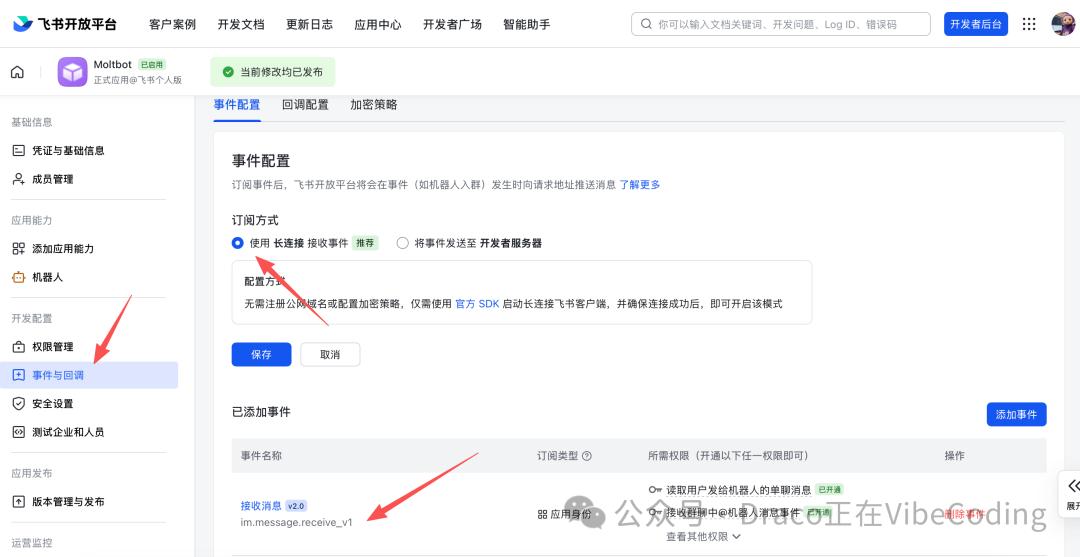
Configure event subscription
1. Click "Save"
5.6.4 Adding Event Subscription
In the "Subscribe to Events" area, click "Add Event":
1. Search for im.message.receive_v1
2. Check the box and confirm the addition.
This event means "Notify me when you receive a message".
5.7 Step 4: Matching and Release
5.7.1 Private Chat Bot Triggers Matching
In Lark:
1. Search for your robot name
2. Enter the private chat interface
3. Send any message, such as "Hello".
The message cannot reach OpenClaw at this point because it needs to be "paired" first.
With the default dmPolicy: pairing, the bot will directly reply with a pairing prompt in Lark private chat, which includes a pairing code.
This is the most intuitive and easiest way for users to get the code.
5.7.2 Method A (Recommended): Approve directly using the pairing code in private chat.
Ask users to send the pairing code they see in Lark private chat to the administrator (or copy it yourself).
Then execute the following in the terminal:
openclaw pairing approve feishuFor example:
openclaw pairing approve feishu A1B2C3D4
(Replace A1B2C3D4 with the actual pairing code seen in Lark private chat)
5.7.3 Method B (Alternative): Check the pairing request in OpenClaw
If you don't see the code in the private message, or want to double-check, run it in the terminal:
openclaw pairing list feishu
It should display:
Code ID Meta RequestedA1B2C3D4 ou_xxx... {...} 2026-02-18T10:10:00.000ZRe-approval:
openclaw pairing approve feishu A1B2C3D4
(Replace A1B2C3D4 with the actual pairing code you saw in the previous step.)
5.7.4 Verify private chat
Back in Lark, send the message again:
Hello, please introduce yourself.
Expected result: The robot replies to the message!
5.8 Step 5: Start a group chat (optional)
Once private chat is established, group chat functionality can be enabled.
5.8.1 Modify Channel Configuration
openclaw channels add --channel feishu
Revise:
• groupChat: enabled
• requireMention: true
5.8.2 Add the robot to the group
1. Create a group in Lark.
2. Click "Add Robot"
3. Search for your robot name
4. Add to group
5.8.3 Group chat @bot test
Send in the group:
@AI Assistant, hello
Expected result: The robot replies to the message!
5.9 Acceptance Checklist
After completing this chapter, you should be able to:
• Create and publish enterprise applications on the Lark Open Platform
• Obtain App ID and App Secret
• Configure permissions and enable Bot capabilities
• Configure Lark Channel on the OpenClaw side
• Enable persistent subscription
• Complete pairing and approval
• Private chatbots can receive replies
• (Optional) Group chat @bots can receive replies
Summary of this section
Key points of Lark integration:
1. Publish first, then open the persistent connection — incorrect timing will cause subscription failure.
2. Private chat first, then group chat – reduce troubleshooting complexity
3. Pairing requires approval – safety first, don't let strangers use it casually.
4. Ensure all permissions are configured – batch importing JSON is the easiest method.
Try it yourself
1. Chat privately with the bot in Lark to test various functions.
2. Try letting a robot help you organize a piece of text.
3. If the company has a test group, add the bot to test the @ function.
4. Record any problems encountered and troubleshoot them against the guidelines in this chapter.
Part 5: Security Measures (Don't let it reply to messages randomly in the company's group chat)
🎯 Chapter Objective: After completing this chapter, you will be able to master the secure configuration of Lark channels and avoid the embarrassment of "bots replying randomly".
⏱️ Estimated time: 20 minutes
📋 Prerequisites: Chapter 5 (Basic Lark Integration) has been completed.
What you will learn in this chapter
• Understand the differences between the three private messaging strategies (pairing/allowlist/all)
• Mastering group chat strategy configuration (the importance of requireMention)
• Configure whitelist (allowFrom/groupAllowFrom)
• Risk control checklist before launch
• Resolve common issues such as persistent connection subscription failures, unanswered messages, and no response to @ mentions.
6.1 Why is a security configuration needed?
Let me first tell you a "bloody lesson":
A company integrated its OpenClaw bot into Lark without configuring security measures. As a result, the bot was added to a large group of 500 people. When someone tagged it with a sensitive question, the bot directly replied with internal data. The group instantly erupted in chaos.
The security issue is not "whether it will happen," but "when it will happen."
The configuration in this chapter is about putting a lock on your robot.
6.2 Private Chat Strategy: Who Can Talk to the Robot?
OpenClaw offers three private chat strategies, which can be selected when configuring the Channel:
6.2.1 Strategy 1: Pairing (Recommended)
Mechanism: Users must first send a message to request a match, and only after the administrator approves can they start a conversation.
Applicable scenarios:
• For internal use by the company
• It is necessary to control who can use the robot.
• Safety First Scenarios
Configuration method:
openclaw channels add --channel feishu
Setting up privateChat: pairing
User flow:
1. User-to-user private chat bot sends arbitrary messages
2. The message was intercepted, displaying the message "Waiting for administrator approval".
3. The administrator first executes `openclaw pairing list feishu` to obtain the code, and then executes `openclaw pairing approve feishu`.
4. Only then can users have normal conversations.
6.2.2 Strategy Two: AllowList
Mechanism: Only users on the whitelist can interact with the bot.
Applicable scenarios:
• Clearly identify who needs to use the robot
• Small team
Configuration method:
{ "privateChat": "allowlist", "allowFrom": ["user1@company.com", "user2@company.com"]}6.2.3 Strategy 3: all (not recommended)
Mechanism: Anyone can talk to the robot.
Applicable scenarios:
• Public Demo
• An environment with complete internal trust
risk:
• Anyone can consume your API quota
• Anyone can see the bot's replies.
6.3 Group Chat Strategy: Don't Let It Reply with Random Messages
6.3.1 requireMention: The safety latch for group chats
This configuration is highly recommended to be enabled!
Mechanism: The bot only replies to messages that mention it in the group, ignoring other messages.
Why is it important?
Imagine this scenario:
• The group has 500 members, and they're chatting enthusiastically.
• The robot listens to all messages
• Someone casually asked, "Could you check last month's sales figures for me?"
• The robot mistook it for a command and began to execute it...
Configuration method:
openclaw channels add --channel feishu
Set requireMention: true
6.3.2 Group Chat Whitelist: Who can add bots to the group?
Even if RequireMention is enabled, it is still recommended to configure a group chat whitelist:
{ "groupChat": "enabled", "groupAllowFrom": ["group1_id", "group2_id"], "requireMention": true}How do I get the group ID?
In the Lark group, click on group settings → group information to see the group ID.
6.4 Risk Control Checklist: 5 Check Items Before Going Live
Before putting the robot into official use, check the following:
6.4.1 Checklist
• Private message strategy: Confirm whether it's a pairing or allowlist, not all.
Group chat strategy: RequireMention is confirmed to be enabled.
• Group chat whitelist: Ensures that only necessary groups are allowed to use it.
• API Limit: Ensure you have sufficient balance and set a budget limit.
• Sensitive Tools: Confirm that high-risk tools (such as command execution tools) have been restricted or disabled.
6.4.2 Setting a budget cap
# View current budget settings: openclaw config get budget.monthly # Set monthly budget cap (USD): openclaw config set budget.monthly 50
6.4.3 Limit high-risk instruments
In the configuration file, restrict the tools that the Agent can use:
{ "agents": { "default": { "tools": { "allow": ["read_file", "write_file", "search_web"], "deny": ["execute_command", "send_email"] } } }}6.5 Troubleshooting Common Problems
6.5.1 Issue 1: Long-lived connection subscription failed.
Symptoms: Lark platform displays "Long connection subscription failed" or "Connection timed out".
Possible reasons:
1. Enabling persistent connections before application release.
2. Gateway not started
3. Network outage
Solution steps:
1. Confirm that the application has been published (Version Management & Publishing → Status is "Published")
2. Confirm that Gateway is running:
openclaw status
3. Restart the persistent connection:
• Disable persistent connections on the Lark platform and save.
• Re-enable the persistent connection and save.
6.5.2 Problem 2: The message