Author: BitMEX
Hello everyone, welcome to the BitMEX Options Alpha. Today, we will explore a hybrid arbitrage strategy that combines a BitMEX call spread with a "No" position on Polymarket, where the question is "Will Bit reach $110,000 by the end of February?". The goal of this strategy is to capture potential upside if Bit rises, while hedging the risk of Bit failing to reach $110,000 by utilizing the Polymarket position. In this article, we will dissect the trade structure, discuss various profit and loss scenarios, and highlight the key risks and considerations you need to be aware of. Let's get started.
Trade Overview
The trade discussed in this article involves:
1. Purchasing a Bit call spread (a bullish position) on BitMEX.
2. Simultaneously purchasing a "No" position on Polymarket for the question "Will Bit reach $110,000 by February 28th?".
Market Setup
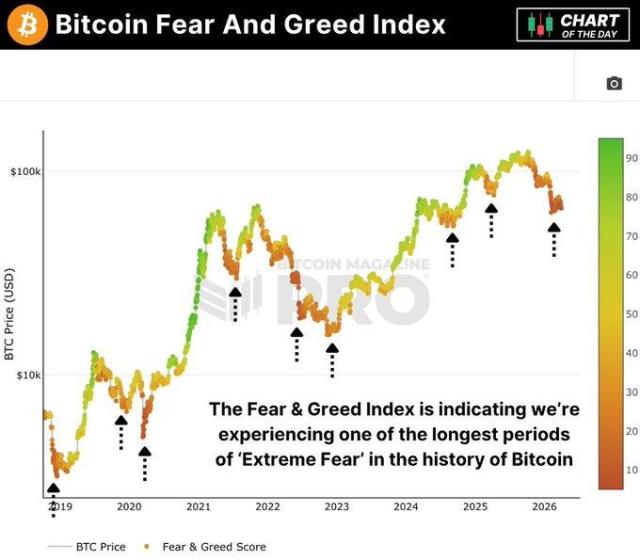
As the end of February approaches, Bit may or may not reach $110,000. Against this backdrop, an interesting arbitrage opportunity emerges: combining a BitMEX options position with a Polymarket hedge.
Polymarket allows users to bet on the binary outcome of events, such as whether Bit will reach a specific price. This provides the possibility of using Polymarket to hedge a Bit position, while also potentially profiting from favorable price movements.
By combining the BitMEX call spread with a "No" position on Polymarket (i.e., betting that Bit will not reach $110,000 by the end of February), traders can balance risk and reward, maximizing the opportunities presented by Bit's volatility.
BitMEX Options Market (Expiring February 28th)
Polymarket
Trade Structure
This strategy relies on two core components:
1. BitMEX call spread
2. Polymarket "No" position on Bit
BitMEX Call Spread (Expiring February 28th)

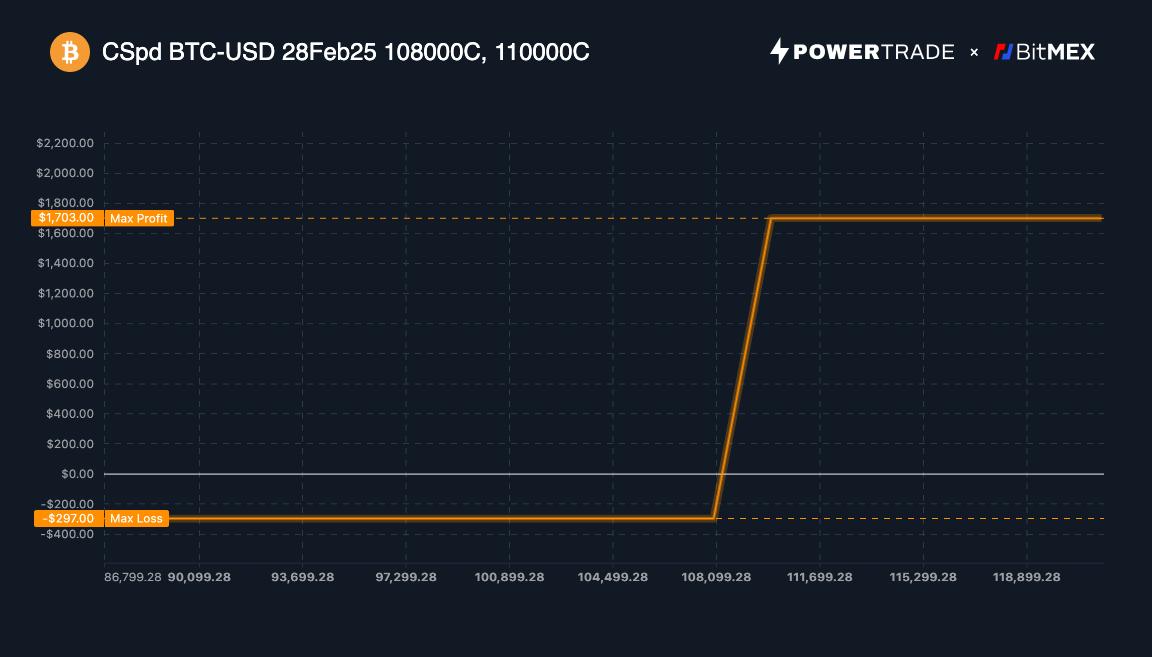
The BitMEX position is a classic call spread, designed to capitalize on an increase in Bit price while limiting downside risk.
Buy 1 $108,000 call option (Expiring February 28th)
Sell 1 $110,000 call option (Expiring February 28th)
This structure provides limited risk and unlimited upside potential (maximum gain of $1,700) if Bit price exceeds the higher strike price.
Polymarket Hedge ("No" Position)
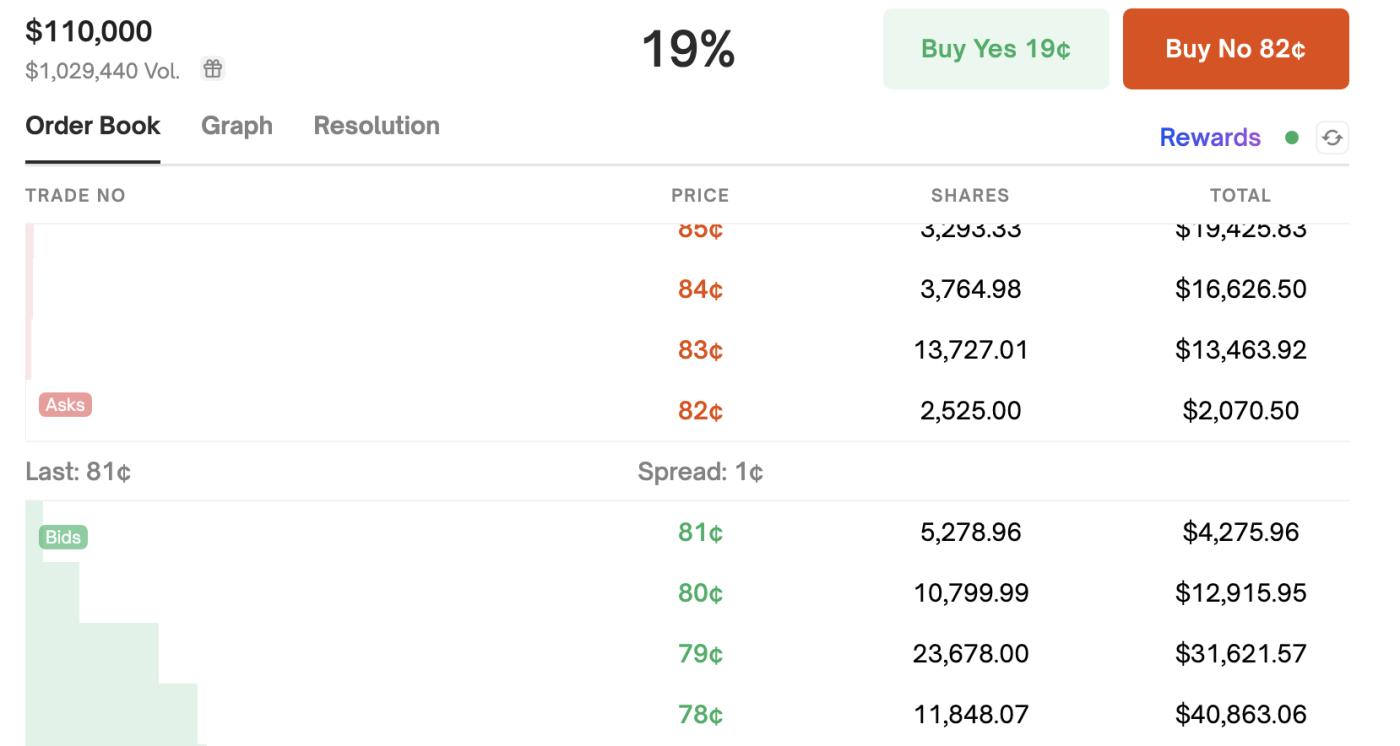
On Polymarket, there is a binary options market where users can speculate on the likelihood of certain events occurring. For this strategy, the relevant question is:
Will Bit reach $110,000 by February 28th?
The position taken here will be the "No" contract, betting that Bit will not reach $110,000 by the end of February.
Purchase the "No" contract at a price of 82¢ (example)
Cost: $250, with a face value of $1
If Bit does not reach $110,000, the expected profit is around $300
If Bit reaches or exceeds $110,000, the expected loss is $1,350
This hedge provides protection in the event that Bit reaches $110,000, helping to offset a portion of the losses from the BitMEX position.
Profit and Loss Analysis
Understanding the potential outcomes of this strategy is crucial for making informed decisions. Let's look at four different scenarios:
Scenario 1: Bit Closes Below $108,000
BitMEX: -$297 (maximum loss)
Polymarket: +$300 (if Bit does not reach $110,000)
Net Profit: +$3
In this case, Bit fails to reach $110,000 by expiration, and the Polymarket "No" position generates a $300 profit. However, the BitMEX call spread incurs the maximum loss of $297. The final result is a small net profit of $3.
Scenario 2: Bit Closes Between $108,000 and $110,000
BitMEX: Profit = (Bit Price - $108,000) - $297
For example, at $109,000, the profit would be $703
Polymarket: +$300 (if Bit does not reach $110,000)
Net Profit: $703 (BitMEX Profit) + $300 (Polymarket) = $1,003
This is the ideal scenario, where Bit closes near $110,000, providing a stable profit from the BitMEX position, while the Polymarket hedge adds an additional $300, resulting in a total net profit of $1,003.
Scenario 3: Bit Closes Above $110,000
BitMEX: +$1,700 (maximum profit)
Polymarket: -$1,350 (if Bit reaches $110,000)
Net Profit: $350
If Bit exceeds $110,000, the BitMEX call spread is maximized at $1,700, but the Polymarket hedge incurs a $1,350 loss. The final net profit is $350.
Scenario 4: Bit Briefly Reaches $110,000 but Closes Below $110,000
BitMEX: If price is below $110,000, there is a loss
For example, at $108,000, the loss would be $297
Polymarket: -$1,350 (because Bit briefly reached $110,000)
Net Loss: -$1,647
In this less favorable scenario, Bit briefly reaches $110,000 but closes below that level. In this case, both the BitMEX call spread and the Polymarket hedge incur losses, resulting in a net loss of $1,647.
Risks and Considerations
While this strategy offers an attractive risk-reward structure, there are several risks to be aware of:
1. Time Risk:
There is a 21-hour settlement gap between BitMEX (February 28th, 08:00 UTC) and Polymarket (February 28th, 23:59 ET). This time window may lead to unexpected Bit movements, potentially rendering the hedge ineffective.
2. Market Liquidity and Price Volatility:
During periods of high volatility, options may have wider bid-ask spreads. Polymarket may have limited depth, and larger orders could move the market price. Slippage and transaction fees should be considered.
Conclusion
This Bit arbitrage strategy provides traders with an opportunity to capture the upside potential of Bit's volatility, while also hedging against key price levels. By combining the BitMEX call spread with a "No" position on Polymarket, you can construct a trade strategy suitable for various market conditions, whether Bit is rising or trading sideways.
However, it is crucial to closely monitor the key risks, including the 21-hour settlement gap and the possibility of Bit reaching and reversing at critical price points. By implementing appropriate risk management techniques, timing the market carefully, and managing liquidity, traders can maximize the potential profits while minimizing exposure to significant losses.
In summary, this strategy provides a balanced risk-return structure for traders who wish to capitalize on Bit price fluctuations, with clear risk control and upside potential.