introduction
In the blockchain world, especially on high-performance public chains like Solana, token management and asset security have always been core concerns for developers, project teams, and investors. With the explosion of DeFi (Decentralized Finance) and NFT (Non-Fungible Token) projects, malicious activities such as bot trading, money laundering, and hacking have become increasingly common. These behaviors not only disrupt market order but can also lead to asset loss or damage to project reputation. To address these challenges, various tools have emerged in the Solana ecosystem, among which the "Convenient Freeze" feature stands out. It allows project teams to quickly prohibit specific accounts from performing certain operations, such as sending transactions, based on customized parameters, effectively preventing malicious bots or other harmful behaviors from damaging assets.
Convenient account freezing is essentially a permission management mechanism, similar to "account freezing" in traditional finance, but implemented in the decentralized environment of blockchain. It doesn't involve permanently destroying assets, but rather temporarily or permanently restricting an account's transfer permissions, helping project maintainers respond to risks promptly. GTokenTool, as part of the Solana toolset, provides a user-friendly interface for this feature, allowing even non-technical users to operate it easily.
Why is a convenient freeze necessary? Imagine you're the creator of a Solana token project and suddenly discover a large number of bot accounts making bulk transfers , attempting to manipulate prices or launder money. Without a rapid intervention mechanism, these actions could cause the token price to plummet or the project to face regulatory scrutiny. A convenient freeze acts like an "emergency brake," allowing you to impose restrictions on specific addresses without affecting the normal operation of the entire network. According to Solana's consensus mechanism, this freeze is achieved by updating the token's Authority Account, ensuring that only authorized parties can perform the operation. This not only improves the project's resilience but also provides a safer investment environment for the community.
Before we begin, let's understand some background information. Solana is a Proof of History (PoH) blockchain with transaction speeds reaching tens of thousands of transactions per second, making it a top choice for DeFi and gaming applications. However, this high speed also brings challenges: malicious scripts can execute a large number of transactions instantly. GTokenTool integrates functions such as token creation , bulk airdrops , market-making bots , and convenient asset freezing, designed with a "secure, one-stop experience" philosophy. This tool supports both the Mainnet and Devnet, and beginners are advised to practice on the testnet first to avoid losing real assets.
Solana Convenient Freezing Procedure
GTokenTool 's convenient freeze page design is simple, and the operation process only requires four steps. Below is a detailed guide, where we will explain the principles and precautions for each step using a real-world scenario. Let's assume you have already practiced on the testnet using a virtual token address.
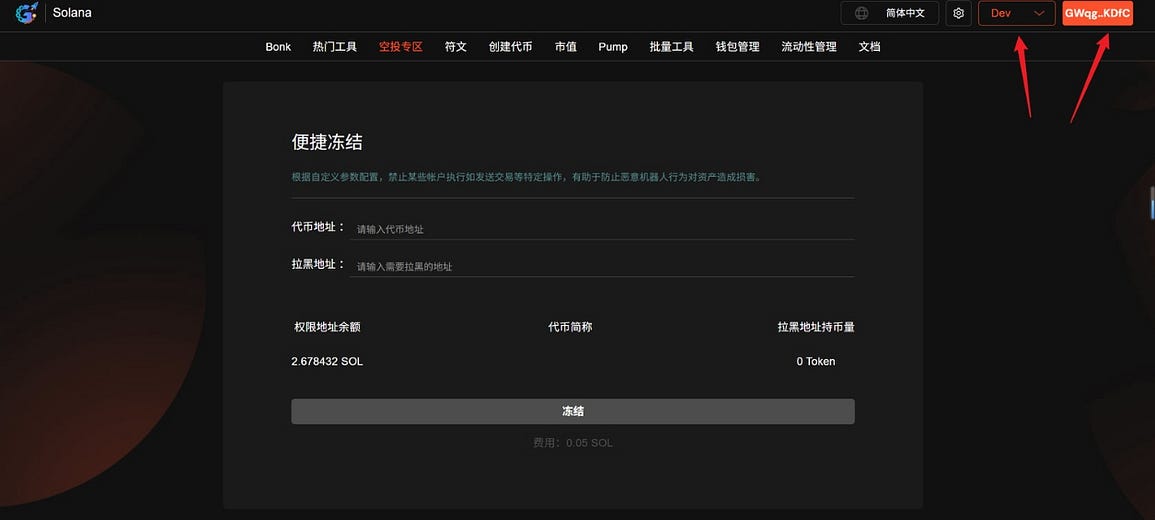
Step 1: Connect your wallet
First, open your browser and visit the Solana Convenient Freeze page: https://sol.gtokentool.com/zh-CN/airdropSection/ConvenientFreeze . This is an interface optimized for Chinese users; if you are using English, you can switch languages.
After the page loads, a "Connect Wallet" button will appear in the upper right corner. Click it and select your Solana wallet (such as Phantom, Solflare, or Backpack). A wallet authorization window will pop up; confirm and the connection will be successful. Important: Select the "Mainnet" network for real-world operation; switch to "Devnet" or "Testnet" for testing to avoid data loss.
Why connect your wallet? Because the freeze operation requires a signed transaction, and only wallets holding Freeze Authority tokens can authorize it. After connecting, the page will display your wallet address and balance; please ensure everything is working correctly. If the connection fails, check if your browser extension is enabled, or try restarting your browser. The entire process takes less than one minute.
Step 2: Enter the token address
In the input box in the center of the page, paste your token address (for example, a string like "EPjFWdd5AufqSSqeM2qN1xzybapC8G4wEGGkZwyTDt1v"). Click "Search" or press Enter, and the system will automatically verify it.
The page will display the token's abbreviation (Symbol, such as USDC), total supply, and whether the authorization address matches your connected wallet. If they don't match, the system will display "Permissions do not match," meaning you do not have the authority to freeze the token. In this case, you need to switch to the correct wallet or transfer permissions using the Solana Program Library (SPL) tool.
This step is based on Solana's Token Program, which queries the token's metadata to confirm ownership. Note: Entering an incorrect address will cause the query to fail; please double-check. Upon success, the page will load the token details, providing the foundational data for subsequent freezing.
Step 3: Enter the address you want to block
Next, in the input box below, enter the wallet address to be frozen (e.g., an address suspected of being a bot). Batch input is supported; separate multiple addresses with commas.
The system will query and display the balance of cryptocurrency held by each address in real time. This helps you confirm your objectives: if the balance is zero, freezing it is meaningless; if it is too high, further investigation may be needed to prevent accidental operation.
Why is the amount of tokens displayed? This is for transparency and decision support. Solana's on-chain data is public and can be obtained through RPC node queries. If the address is invalid, the page will display an error message. It is recommended to use tools such as Solana FM or Birdeye to check the address's activity history before entering it to ensure it is not from a malicious source.
Step 4: Click "Freeze"
Once everything is ready, click the "Freeze" button. A transaction confirmation window will pop up in your wallet, displaying the estimated gas fees and operation details. After carefully reading it, click "Confirm".
Once a transaction is broadcast to the Solana network, it typically completes within seconds (thanks to Solana's high TPS). Upon success, a "Frozen Successfully" message will pop up on the page, and the transaction ID will be recorded. You can view the details using Explorer.
If it fails, possible reasons include network congestion, insufficient gas, or permission issues. Retry or check the logs. After freezing, the address cannot transfer the tokens, but the holdings are still visible. This is a reversible operation; if unfreezing is required, it can be achieved using similar tools or CLI commands.
in conclusion
Convenient asset freezing is an indispensable security tool in the Solana ecosystem. GTokenTool's user-friendly interface allows you to easily protect your assets from malicious threats. This tutorial provides a comprehensive overview of every step, from preparation to operation, aiming to help you apply it with confidence.