Author: Figo, IOSG Ventures
Farcaster is a decentralized social network, offering an alternative to traditional platforms like Twitter and Reddit. Users can create profiles, post “casts,” and follow others while maintaining ownership of their accounts and connections. This decentralized approach allows users to move between different apps without losing their data or connections, prioritizing user autonomy, privacy, and interoperability.
What are Frames?

Frames are a unique feature of Farcaster that allow users to embed interactive experiences directly within their Casts. This turns static posts into dynamic content, enhancing the user experience. Frames can include elements like polls, live updates, or entire applications, providing various ways for user engagement.
How Frames Work
From a technical perspective, Farcaster Frames use both on-chain and off-chain capabilities. They are lightweight web applications embedded within Casts. The Frame Specification outlines the technical requirements and standards for creating compatible Frames, ensuring they work across the Farcaster ecosystem.
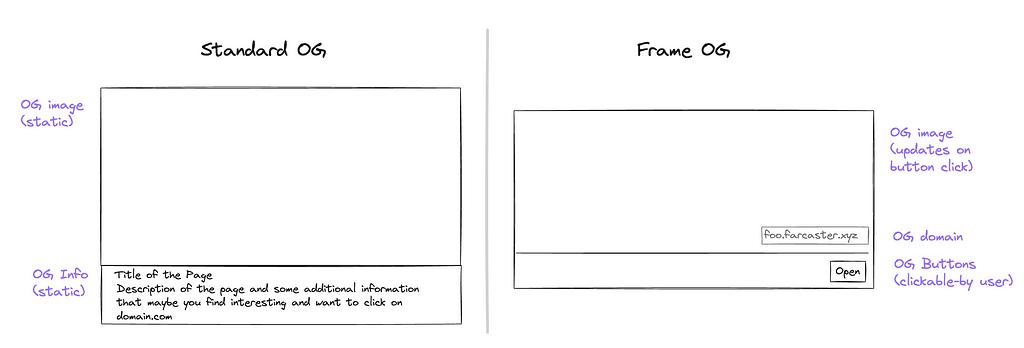
Frames extend the Open Graph standard, transforming static embeds into interactive experiences. Developers start by choosing an Open Graph image and then add interactive buttons. When a button is clicked, a callback is triggered, updating the Frame with new content or actions. This interaction is managed by users and developers, fostering a decentralized approach.
Warpcast, one of the main clients of Farcaster, supports these interactive Frames, allowing users to create dynamic content on the platform. The diagram below illustrates the difference between a standard Open Graph (OG) embed and a Frame OG inside Warpcast.
Examples of Frames
The applications of Farcaster Frames are diverse, catering to both users and developers. Here are some examples:
- Interactive Polls: Users can embed live polls within their Casts, allowing followers to vote and see real-time results. This enhances user engagement and fosters community interaction.
- NFT Showcases: Developers can create Frames that allow users to mint and display NFTs directly within their Casts. This bridges the gap between social media and the world of NFTs, enabling new forms of creative expression.
- Live Feeds and Galleries: Frames can be used to create live feeds or interactive galleries, providing a dynamic and engaging way to share content on Farcaster.
By enabling these interactive experiences, Farcaster Frames are transforming how content is created, shared, and interacted with on social media. They offer a framework for developers to build innovative applications that integrate seamlessly with the Farcaster network, opening up new possibilities for both content curation and user engagement.
What and Why Frog?
Frog, developed by Paradigm and Wevm, is a framework designed for creating Farcaster Frames. It simplifies the process, allowing developers to build interactive and high-performing frames easily. Frog includes a built-in debugger, live reloading, and seamless deployment options.
Current Challenges in Building Farcaster Frames
Developing on a new framework can pose challenges such as:
- Complex State Management: Handling client-side reactivity and state efficiently.
- Size and Behavior Constraints: Navigating limitations on frame tags’ size and functionality.
- Security Concerns: Ensuring secure message verification and frame integrity.
- Performance Optimization: Managing load performance and minimizing unnecessary HTML content.
How Frog Solves These Challenges
Frog addresses these problems by introducing features that simplify Frame Development:
- Local Debugger with Live Reloading: Provides instant feedback, speeding up development.
- Simplified State Management: Utilizes state derivation for effortless state handling.
- Enhanced Security: Offers built-in verification tools for secure frame development.
- Optimized Performance: Enables the creation of highly optimized frames for fast load times.
- Flexible Deployment: Allows deployment to any JavaScript runtime, avoiding vendor lock-in and providing more flexibility.
Using Frog not only simplifies the development process but also enhances the developer experience by making the creation of secure, efficient, and interactive frames more accessible. This opens up endless possibilities for innovation on Farcaster.
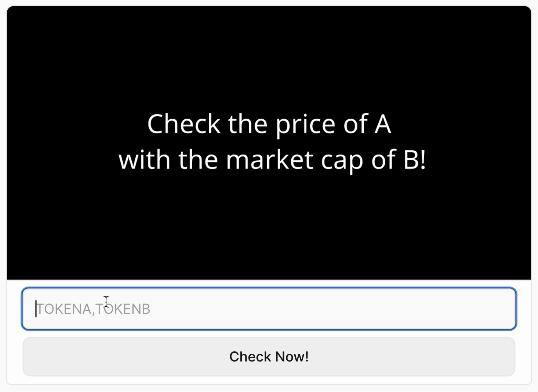
Project Tutorial: MarketCapOf Frame
We’ll be building a Farcaster Frame inspired by MarketCapOf. This tool allows us to visualize what the price of one cryptocurrency (A) would be if it had the market capitalization of another cryptocurrency (B). It’s a useful tool for gaining insights into the crypto market.
Here’s a quick preview of what we’ll be creating:
By the end of this tutorial, you will:
- Build a Farcaster Frame capable of dynamically calculating and displaying the price of one cryptocurrency based on the market cap of another.
- Validate and test your Frame on Warpcast, ensuring it functions seamlessly within the Farcaster ecosystem.
Let’s get started!
Pre-Requisites
Before we begin, make sure you have the following:
- npm Installed: Ensure you have Node Package Manager (npm) installed on your machine. If you don’t have it yet, you can download and install it from here.
- Farcaster Account: Create a Farcaster account if you haven’t already. You can sign up at Farcaster.
Note: This tutorial assumes you are comfortable with and have a basic understanding of JavaScript.
Setting Up Your Project
First, open your terminal and initialize your project with Frog:
npm init frog -- -t next
You should see a setup prompt like this:
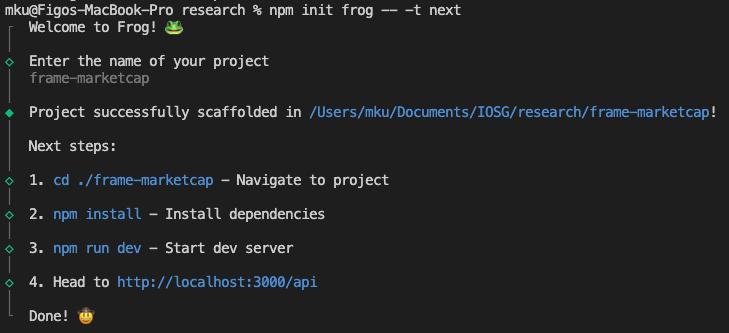
Follow the instructions to give your project a name.
Once the project is initialized,
- Navigate into the project directory: cd project-name
- I recommend opening the project folder in your preferred IDE. For example, if you’re using VS Code, you can do this with: code .
- Now inside the project folder, install the necessary dependencies: npm install
- Start the development server! npm run dev
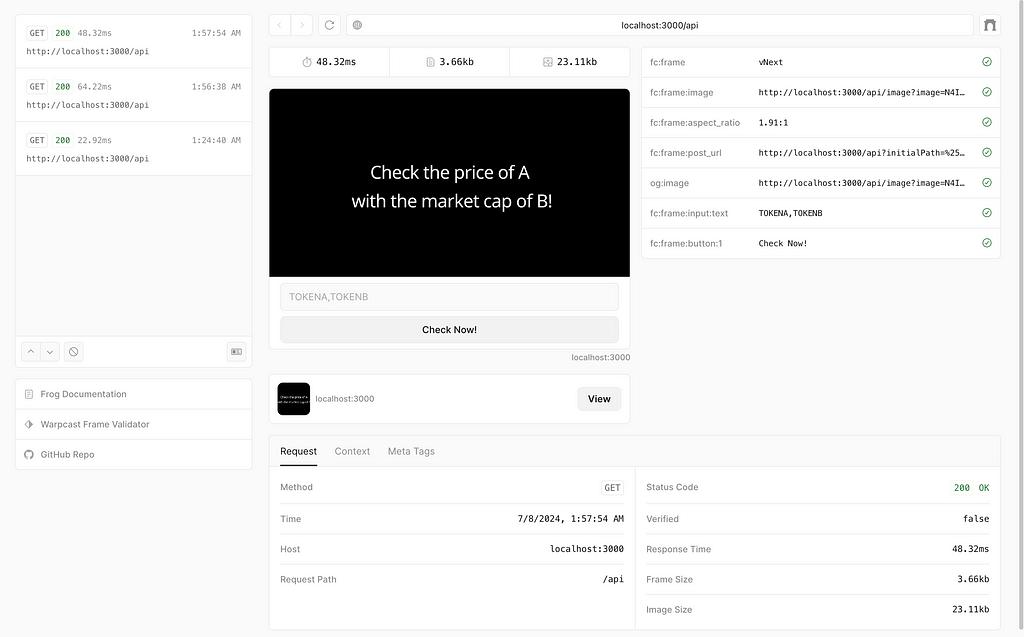
Once the server is running, head to https://localhost:3000/api/dev in your browser.
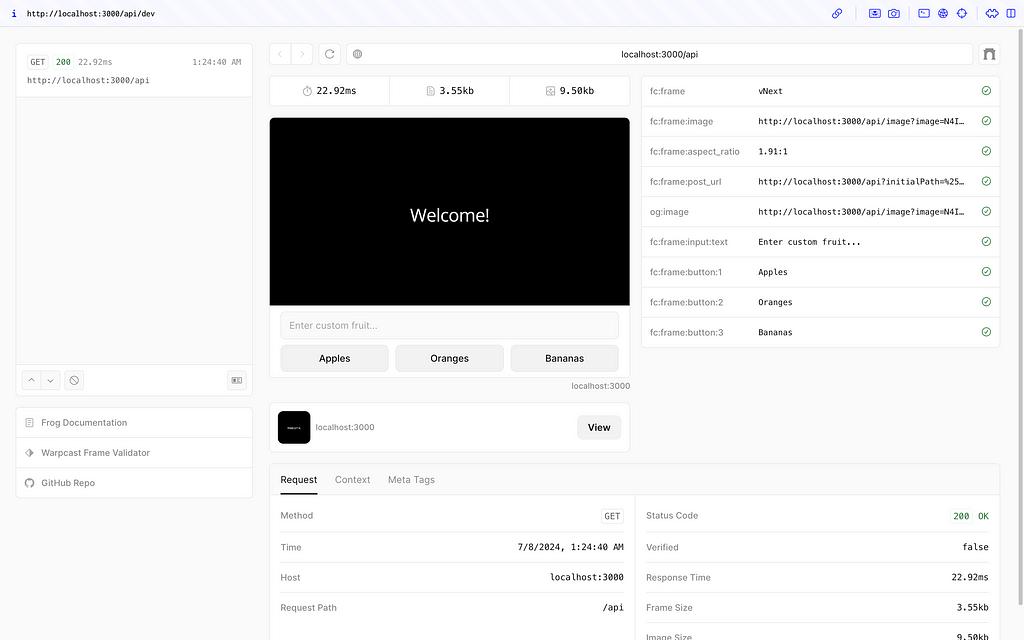
One of the best features of Frog is that it comes with a built-in Frame tester UI. This tool provides an intuitive way to see changes made in your code reflected visually, making development faster and more efficient.
The default template is a simple demo frame that allows you to choose an item and see your selection. While this is a helpful starting point, there’s still some work to transform it into our MarketCapOf Frame.
Building Our App
Let’s dive into building our app. Start by navigating to app/api/[[...routes]]/route.tsx. This file is the heart of our application and where the frame endpoints will go. You'll see that a Frog application is instantiated by calling the Frog class.
We will modify this to set up our app. Let’s start by adding a title:
const app = new Frog({
  assetsPath: "/",
  basePath: "/api",
  title: "Frame Market Cap", // add a title
  // Supply a Hub to enable frame verification.
  // hub: neynar({ apiKey: 'NEYNAR_FROG_FM' })
});
Farcaster Frames consist of two main UI components: an Image and a set of Intents. We can specify these components in the Frog API via the image and intents properties of the returned frame response.
In this same file, you’ll also see how easy it is to return an image to the UI. By writing JSX code and applying styling, Frog will automatically convert it to an image.
app.frame('/', (c) => {
  const { buttonValue, inputText, status } = c
  const fruit = inputText || buttonValue
  return c.res({
    image: (
      <div>
        {/* The JSX code here is automatically converted into an image */}
      </div>
    ),
    intents: [
      ...
    ],
  })
})
Designing Our App Flow
The main idea of our app is straightforward. Here’s how it will work:
- Beginning at / root, the first page image will describe what our app does and prompt the user for input.
- The user will enter a pair of tokens (Token A and Token B). User clicks Submit.
- We pass this input to a new /compare frame where we will then fetch the data for the requested tokens from the CoinMarketCap (CMC) API.
The intent property will hold an array of actionable items. In our case, we’ll keep just one TextInput for the token pair (formatted as tokenA,tokenB) and a submit button.
We also need to specify an action to determine the where the user will be taken to upon submission. Let’s make this action direct users to the /compare endpoint.
Let’s also also remove the unnecessary code above the return regarding the c variable. We will discuss more about this soon.
After making these updates, we will have:
app.frame("/", (c) => {
return c.res({
action: "/compare",
image: (
<div
style={{
alignItems: "center", background: "black", display: "flex", flexDirection: "column",
flexWrap: "nowrap", height: "100%", justifyContent: "center", textAlign: "center", width: "100%",
}}
>
<div
style={{
color: "white", fontSize: 60, fontStyle: "normal", whiteSpace: "pre-wrap",
}}
>
{"Check the price of A\n with the market cap of B!"}
</div>
</div>
),
intents: [<TextInput placeholder="TOKENA,TOKENB" />, <Button value="mine">Check Now!</Button>],
});
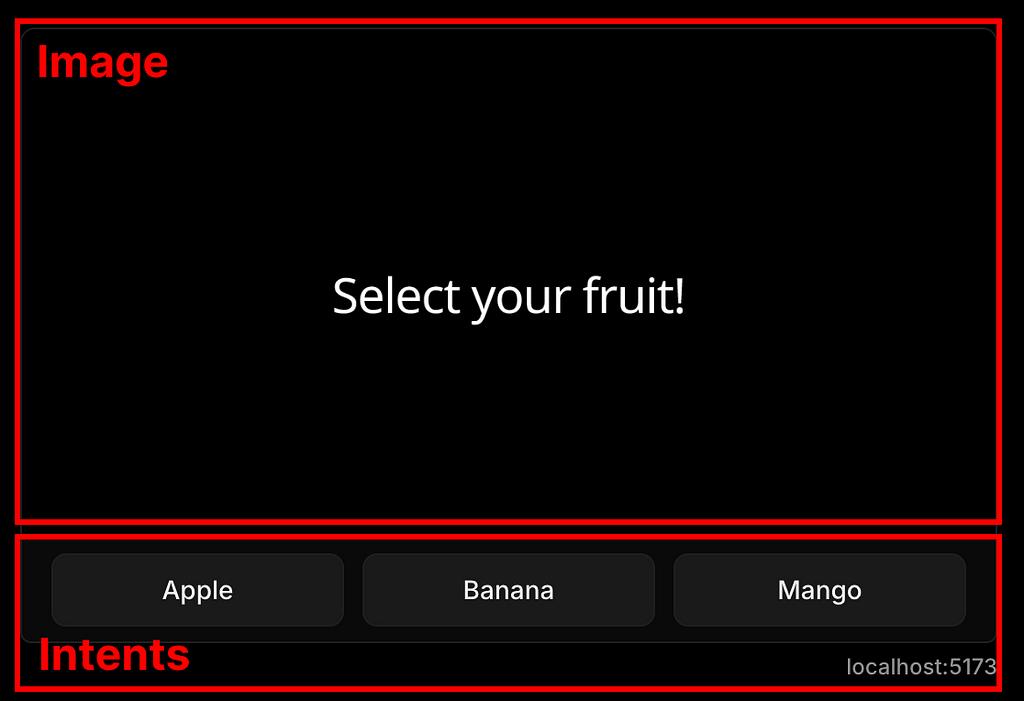
});With these changes, our new root / frame is set up and ready to go! Now, refresh the Frog UI to see the updated frame with the new description and input fields.
However, if you input the tokens (lets say eth,btc ) and press “Check Now!”, nothing will happen. This is because we have not created the /compare endpoint yet! Let’s do it now.
Context Passing
In the same route.tsx file, let’s create a new frame route. We can start by copying what we have for the / route. However, before making any changes, let’s take a closer look at what the c parameter actually is by logging its value. For now, we can delete the action and intents properties of this new frame first.
app.frame("/compare", (c) => {
   console.log({ c })

   return c.res({
      image: (
        <div
          style={{
            alignItems: "center", background: "black", display: "flex", flexDirection: "column",
            flexWrap: "nowrap", height: "100%", justifyContent: "center", textAlign: "center", width: "100%",
          }}
        >
          <div
            style={{
              color: "white", fontSize: 60, fontStyle: "normal", whiteSpace: "pre-wrap",
            }}
          >
            {"Check the price of A\n with the market cap of B!"}
          </div>
        </div>
      )
    });
});
Refresh the frame UI, enter an input, and click “Check Now!”. Let us take a look at the value of c that gets logged:
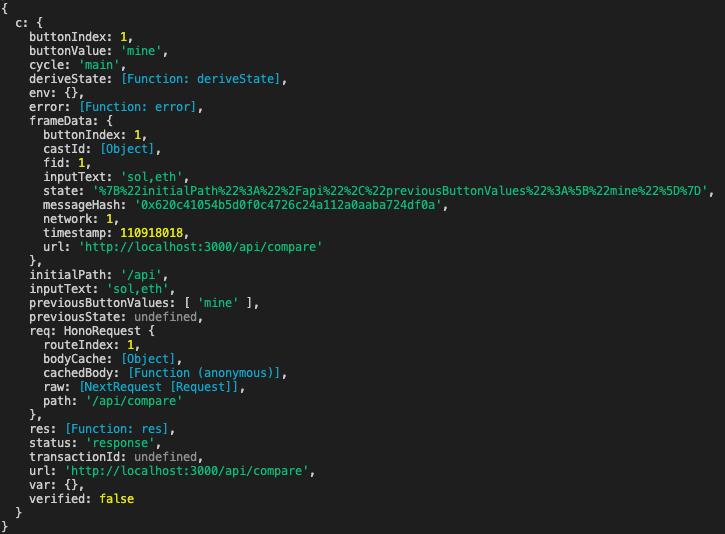
From this log, we see that c is actually the frame context object. It stores useful information such as the inputText that was submitted from the last frame. This c parameter contains other properties about the frame and previous context, such as:
- The frame data (trustedData/untrustedData)
- The button index/value or input value that was interacted with
- A function to derive and set state
- The initial/start path of the frame
- The current URL of the frame
- And more
This is how we pass context and user inputs from one frame to the next. This context can be used by us to extract the token pair information submitted by the user. For now, we can ignore frameData as we are not validating the frame yet. This will be covered when we set up frame verification in a later section. For now, we will use c.inputText to get the token pair entered by the user and process it accordingly in our /compare route.
Setting Up Our “/compare” Frame
After retrieving the requested tokens (Token A and Token B), the necessary data from CoinMarketCap will include the current price and Fully Diluted Valuation (FDV) of each token. For now, let’s set up a basic structure using static mock data and create a simple UI layout to display the results.
Here’s the updated code for the /compare frame:
app.frame("/compare", (c) => {
  const { inputText = "" } = c;

  const tokenA = inputText.split(",")[0].toUpperCase(); // ETH
  const tokenB = inputText.split(",")[1].toUpperCase(); // BTC

  // Mock data for token A and token B
  const priceA = 3000;
  const marketCapA = 360000000;

  const priceB = 57000;
  const marketCapB = 1100000000;

  // Calculate the price of Token A if it has the market cap of Token B
  const multiplier = marketCapB / marketCapA;
  const calculatedPrice = multiplier * priceA;

  return c.res({
    image: (
      <div
        style={{
          alignItems: "center", background: "black", display: "flex", flexDirection: "column", height: "100%",
          justifyContent: "center", textAlign: "center", width: "100%", color: "white", whiteSpace: "pre-wrap"
        }}
      >
        <div
          style={{ fontSize: 40, marginBottom: 20 }}
        >
          {`${tokenA} with the market cap of ${tokenB}`}
        </div>
        <div
          style={{ fontSize: 80, marginBottom: 30 }}
        >
          {`$${calculatedPrice.toFixed(2)} (${multiplier.toFixed(2)}x)`}
        </div>
        <div
          style={{ fontSize: 30 }}
        >
          {`${tokenA} Market Cap: $${marketCapA.toFixed(2)}\n${tokenB} Market Cap: $${marketCapB.toFixed(2)}`}
        </div>
      </div>
    ),
  });
});
Now, go back to the frame UI and test by entering eth,btc as input.

Fantastic! We can now see that the formula logic worked, and our layout is also looking good. Next, we need to set up the actual data retrieval.
Creating Utility Functions
At the root directory of your project, create a new utils folder and initialize an index.tsx file inside this folder. This is where we will store our utility functions.
Our app depends on being able to retrieve dynamic price data. For this, we will use the CoinMarketCap API. You can get a free API key here.
First, create a .env.local file in the root directory of your project. This is where we will store the CMC_API_KEY.
// .env.local
CMC_API_KEY=<your coin market cap api key>
You might need to restart the program in the terminal for the environment file to be read.
Next, add the following code to your index.tsx file in the utils folder:
export const fetchTokenData = async (tokenSymbols: string) => {
  const response = await fetch(`https://pro-api.coinmarketcap.com/v2/cryptocurrency/quotes/latest?symbol=${tokenSymbols}`, {
    headers: {
      "X-CMC_PRO_API_KEY": process.env.CMC_API_KEY as string,
    },
  });

  if (!response.ok) {
    throw new Error(`Failed to fetch data: ${response.statusText}`);
  }

  return response.json();
};

export const getTokenPrice = async (tokenSymbol: string) => {
  try {
    const tokenData = await fetchTokenData(tokenSymbol);
    const tokenArray = tokenData.data[tokenSymbol.toUpperCase()];

    if (!tokenArray || tokenArray.length === 0) {
      throw new Error(`No data found for ${tokenSymbol}`);
    }

    const tokenInfo = tokenArray[0];
    const usdQuote = tokenInfo.quote && tokenInfo.quote.USD;

    if (!usdQuote) {
      throw new Error(`USD quote not available for ${tokenSymbol}`);
    }

    return {
      price: usdQuote.price,
      marketCap: usdQuote.market_cap,
    };
  } catch (error: any) {
    console.error(`Error getting token price for ${tokenSymbol}:`, error.message);
    return {
      price: null,
      marketCap: null,
      error: error.message,
    };
  }
};
In the same file, let’s also add a formatNumber function that we can use to format numbers properly throughout our app:
export const formatNumber = (num: number) => {
  let formattedNum = num.toFixed(2);
  return formattedNum.toString().replace(/\B(?=(\d{3})+(?!\d))/g, ",");
};
With these utility functions in place, we can now fetch token data from CoinMarketCap and format numbers for display.
Finishing “/compare”
Now let’s update our /compare frame with the utility functions we wrote. Since fetching the token prices takes time, remember to add await to the beginning of the function and also make the function declaration async.
First, update the /compare frame to use the utility functions:
import { getTokenPrice, formatNumber } from './utils';

app.frame("/compare", async (c) => {
  const { inputText = "" } = c;

  const tokenA = inputText.split(",")[0].toUpperCase();
  const tokenB = inputText.split(",")[1].toUpperCase();

  const { price: priceA, marketCap: marketCapA, error: errorA } = await getTokenPrice(tokenA);
  const { price: priceB, marketCap: marketCapB, error: errorB } = await getTokenPrice(tokenB);

  // ...
});
Next, add a button to allow the user to go back to the root frame and enter another pair. To do this, we simply add a button with an action that navigates back to /.
return c.res({
  action: "/",
  image: (
    // ...
  ),
  intents: [<Button>Try another pair</Button>],
});
Finally, let us add some error handling and finish the /compare frame is ready!
app.frame("/compare", async (c) => {
  const { inputText = "" } = c;

  try {
    const tokens = inputText.split(",");
    if (tokens.length < 2) {
      throw new Error("Invalid input. Please provide two tokens separated by a comma.");
    }

    const tokenA = tokens[0].toUpperCase();
    const tokenB = tokens[1].toUpperCase();

    const { price: priceA, marketCap: marketCapA, error: errorA } = await getTokenPrice(tokenA);
    const { price: priceB, marketCap: marketCapB, error: errorB } = await getTokenPrice(tokenB);

    if (errorA || errorB) {
      throw new Error(errorA || errorB);
    }

    const multiplier = marketCapB / marketCapA;
    const calculatedPrice = multiplier * priceA;

    return c.res({
      action: "/",
      image: (
        <div
          style={{
            alignItems: "center", background: "black", display: "flex", flexDirection: "column", height: "100%",
            justifyContent: "center", textAlign: "center", width: "100%", color: "white", whiteSpace: "pre-wrap"
          }}
        >
          <div
            style={{ fontSize: 40, marginBottom: 20 }}
          >
            {`${tokenA} with the market cap of ${tokenB}`}
          </div>
          <div
            style={{ fontSize: 80, marginBottom: 30 }}
          >
            {`$${formatNumber(calculatedPrice)} (${formatNumber(multiplier)}x)`}
          </div>
          <div
            style={{ fontSize: 30 }}
          >
            {`${tokenA} Market Cap: $${formatNumber(marketCapA)}\n${tokenB} Market Cap: $${formatNumber(marketCapB)}`}
          </div>
        </div>
      ),
      intents: [<Button action="/">Try another pair</Button>],
    });
  } catch (error: any) {
    console.error("Error occurred:", error.message);
    return c.res({
      action: "/",
      image: (
        <div
          style={{
            alignItems: "center", background: "black", display: "flex", flexDirection: "column", height: "100%",
            justifyContent: "center", textAlign: "center", width: "100%", color: "white", whiteSpace: "pre-wrap"
          }}
        >
          <div
            style={{ fontSize: 40, marginBottom: 20 }}
          >
            {`An Error Has Occurred :(`}
          </div>
        </div>
      ),
      intents: [<Button action="/">Go Back and Try Again</Button>],
    });
  }
});
Give it a try! Your app should now be able to retrieve dynamic price data from CoinMarketCap and display the correctly formatted calculation in the UI. Our app is done! 🎉
Validation and Testing
Frame Validation
Verifying and validating frames is crucial before pushing them to production. Without verification, inputs can be spoofed, compromising data integrity. We want users to be verified and signed in to Farcaster via the Warpcast client, ensuring that interactions with frames are genuine.
For use cases like collecting votes or other critical interactions, verification is essential. However, for simpler applications, like our current example, it may not be as critical.
Frog makes the verification process simple by enabling a hub. The two most commonly used hubs are Neynar and Pinata. In our code template, we can uncomment the code for Neynar to enable verification for our frame.
Here’s how you can enable Neynar:
// other imports..
import { neynar } from "frog/hubs";

const app = new Frog({
  assetsPath: "/",
  basePath: "/api",
  title: "Frame Market Cap",
  hub: neynar({ apiKey: "NEYNAR_FROG_FM" }),
});
Once enabled, your frames will now require verification. However, this means that running the app on localhost will result in an invalid signature error, since localhost is not signed in to Farcaster.

Now, we need to explore ways to test our frame in an online setting, connected to a Farcaster client.
Testing Online
To test your Farcaster Frame properly, you need to be signed in to a Farcaster account. This can be done in two ways:
- Login via the Frog Testing UI: Click on the top right login button in the Frog Testing UI to log in.
- Warpcast Frames Validator: Use the Warpcast Frames Validator.
For the second method, you need to make your localhost accessible to the internet. I highly recommend using ngrok. If you are on a Mac, you can install it by running brew install ngrok/ngrok/ngrok in your terminal. Once installed, simply enter ngrok http 3000 to make your localhost accessible via a public URL.

Then, go to the Warpcast Frame Validator and enter your ngrok URL. For example: https://7a32-193-142-202-2.ngrok-free.app/api
However, I personally prefer the first method as it’s faster and easier. You can just scan the login QR code and you’ll be connected in less than a minute!
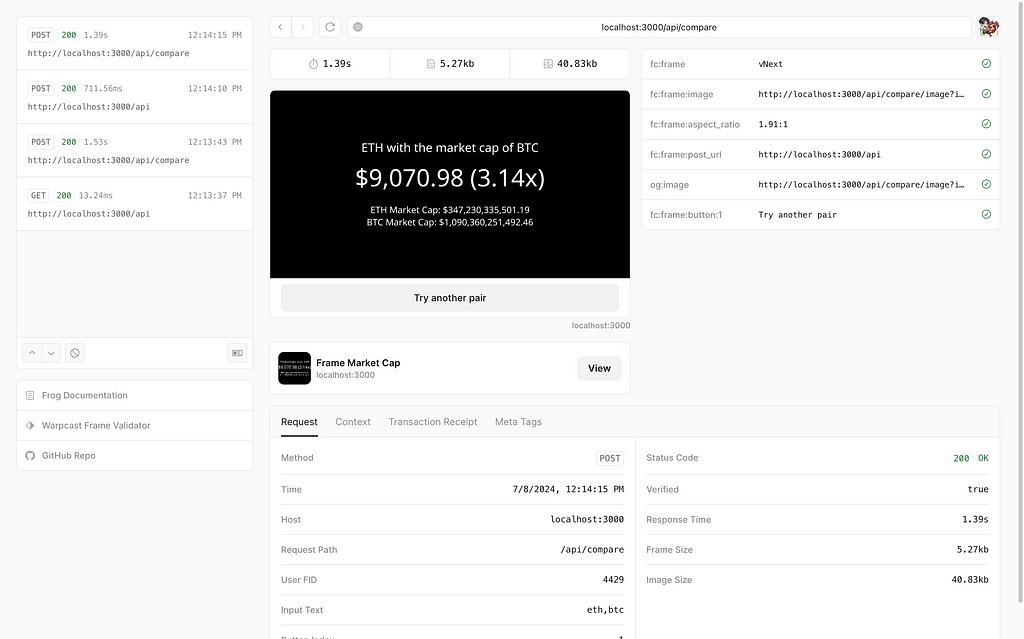
Once logged in, let’s try looking at the value of c again at the /compare endpoint:
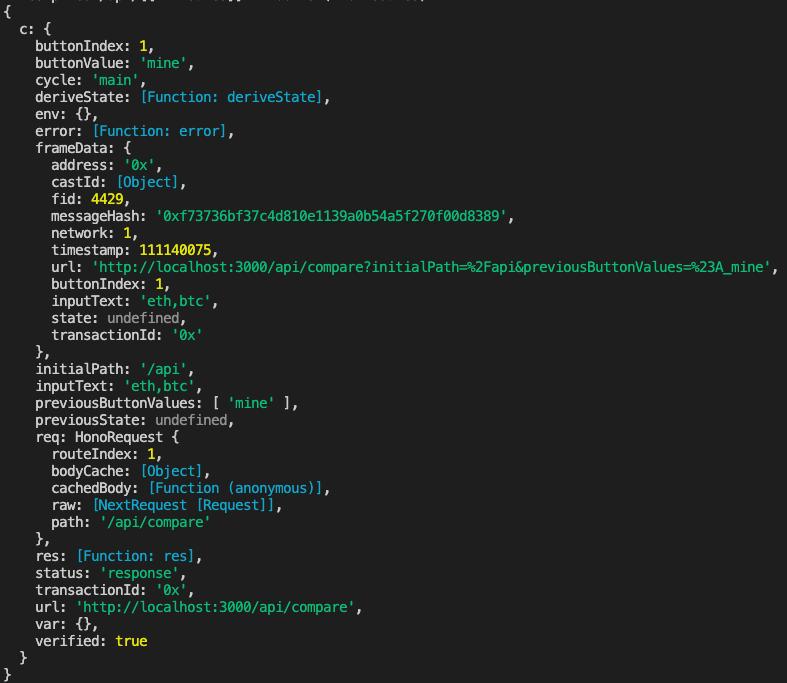
We can see that the verified field now shows true. With this, we can also now take our inputText from frameData instead, which is more secure since it has been verified.
Update your /compare frame to use frameData for extracting inputText:
app.frame("/compare", async (c) => {
  console.log({ c });

  // const { inputText = "" } = c;

  // use this instead when verification is enabled
  const { frameData, verified } = c
  const { inputText = ""} = frameData || {}

  // ...
});
By ensuring your frames are verified, you enhance security and trust, ensuring that user interactions are legitimate and protected.
Bonus: Deploying!
As a bonus, you can also deploy your app to Vercel using the Vercel CLI. This will allow you to share your Farcaster Frame with others and see it live on the web. To deploy, simply follow these steps:
- Install Vercel CLI: npm install -g vercel
- Login to Vercel: vercel login
- To deploy your app, from the root directory of your project, run: npm run deploy
For more detailed instructions, you can refer to this Frog documentation on deploying to Vercel.
Next Steps
Congratulations on building your first Farcaster Frame! You’ve now grasped the basics of how to easily build and test your frame using Frog. With Frames, you’re stepping into a world of interactive possibilities on Farcaster. This is just the beginning; there’s so much more to explore and create in this exciting, innovative space. The potential for creativity and engagement is limitless.
Some directions you can consider would be to explore more advanced Frame interactions such as:
- Transactional Frames: Develop frames that interact with smart contracts, enabling on-chain transactions directly within Farcaster.
- Socially-Integrated Frames: Leverage Farcaster’s native social data to create rich, socially-aware applications.
- Advanced Interactions: Design frames that guide users through detailed processes for enhanced engagement.
To further explore Frames, please check out our beta IOSG Developer Hub site, where you’ll find the GitHub repository for this tutorial and future blogs, study materials, events, and other developer-centric resources. You can also join our IOSG Developer Community on Telegram for support and discussion of all things technical!
If you found this tutorial helpful, please share and give it a clap. Thanks again, and stay tuned for more! Keep exploring and building!
Resources
Farcaster Frames: https://docs.farcaster.xyz/learn/what-is-farcaster/frames
Frog: https://www.paradigm.xyz/2024/02/frames
Farcaster Frames: Building Your First Frame Using Frog was originally published in IOSG Ventures on Medium, where people are continuing the conversation by highlighting and responding to this story.