Author: Anony
This article briefly introduces the method of making a Krux Signer using the K210 development board, as well as the characteristics and user experience of Krux.
Krux Signer Introduction
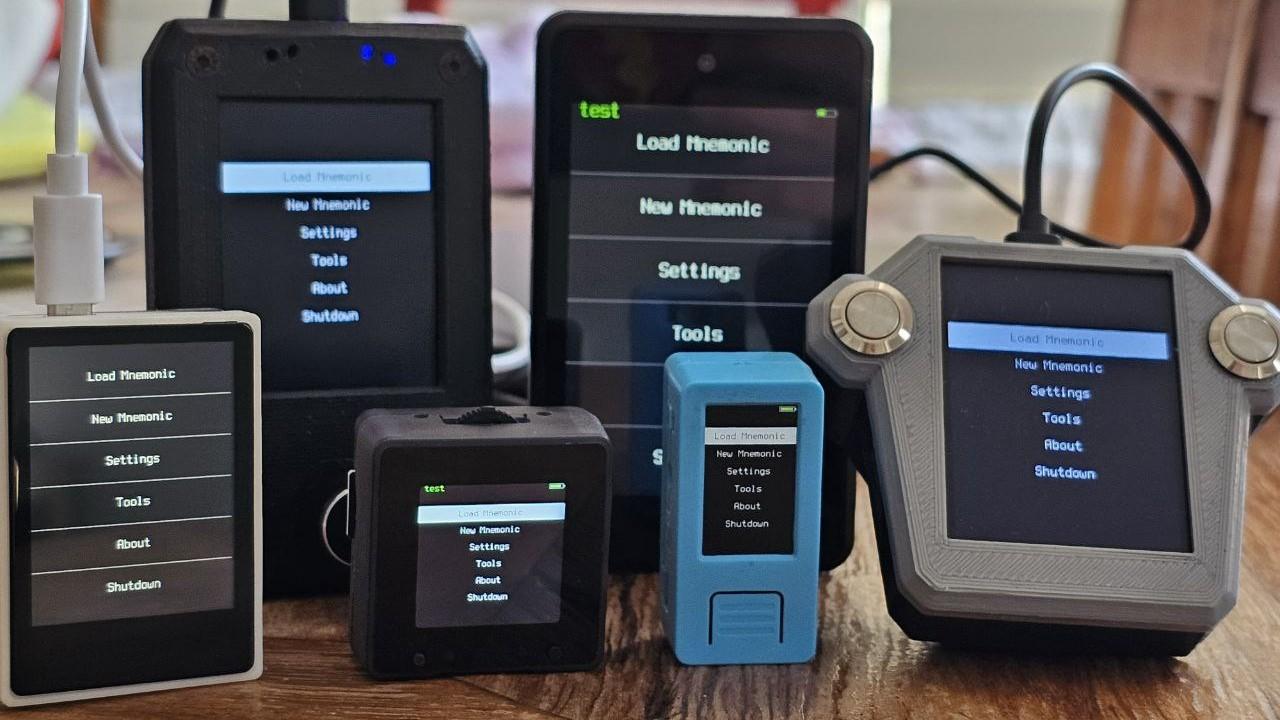
Krux is an open-source firmware that can transform a development board based on the K210 chip into a Bitcoin hardware signer. The K210 chip is designed based on the open-source RISC-V instruction set, which means players have quite a few choices when making Krux hardware. The Krux manual's device page provides 7 hardware options that can be flashed with Krux firmware.
As a self-made signer, Krux is conceptually similar to SeedSigner and Jade-DIY, but there are many differences in user experience:
- Many Krux hardware devices support touchscreens, which are not supported by SeedSigner and Jade-DIY.
- Krux has better multilingual support. Krux also supports Chinese.
- All Krux hardware requires a camera, which means it has a default camera-display (QR code scanning-displaying) Air-gapped experience. However, many Jade-DIY hardware devices do not have cameras (though this also means Jade-DIY can always achieve the lowest production cost).
- Krux offers more choices in key storage. We will elaborate on this later.
Overall, the touchscreen is Krux's unique feature in terms of experience. Additionally, since many of its hardware devices come with simple cases, this makes assembly more convenient (unlike SeedSigner, which inevitably requires 3D-printed cases) and offers cheaper options.
Hardware Selection
On the Krux device page, three devices support touchscreens:
- Maix Amigo (3.5-inch screen)
- Yahboom k210 module (2-inch screen)
- WonderMV (2-inch screen)
These three devices do not require additional accessories or 3D-printed cases.
When purchasing hardware, be sure to choose a kit with a camera.
Considering economics, the author chose the Yahboom k210 module. However, the Krux flashing process is so simple that the author believes the firmware flashing process will not differ regardless of which hardware is selected.
Firmware Flashing
Firmware flashing can be divided into two steps: (1) downloading the installer; (2) automated flashing.
Downloading the Installer (and Verification)
This article uses the simplest graphical interface installer. You need to choose the corresponding installer program based on your computer's operating system.
This article assumes the reader uses Windows, so you need to download these three items from the top of this page:
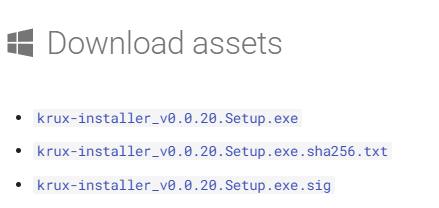
These three items are: the Krux installer installation file, a file containing a SHA256 hash value, and a signature for the Krux installer program.
After downloading these three items to the same folder, we will verify that the downloaded program has not been tampered with using the following steps:
Hold the "SHIFT" key and right-click to open "Powershell" or "Terminal", and enter the following command:
Get-Filehash ./krux-installer_v0.020.setup.exeAfter pressing Enter, the program will return the file's hash value. Manually open the adjacent sha256.txt file and compare whether the hash values match. If they match, the file has not been tampered with; if not, do not use this installation file!
In the terminal, use the following command to obtain the Krux developer's public key:
gpg --keyserver hkps://keys.openpgp.org --recv-keys B4281DDDFBBD207BFA4113138974C90299326322Then, use the gpg signature verification command to verify that the .exe.sig is a valid signature for the .exe:
gpg --verify ./krux-installer_v0.020.setup.exe.sigIf verified, the printed screen information should contain the words "good signature". If not verified, do not use the downloaded installation file!
(Experienced readers will notice that this signature is not for the hash file but for the installation file. The author is also unsure why.)
To ensure that the downloaded software has not been tampered with or contaminated, do not skip these verification steps.
Automated Flashing
After verifying the file's integrity, you can run the previously downloaded setup.exe. After installation, this interface will appear:
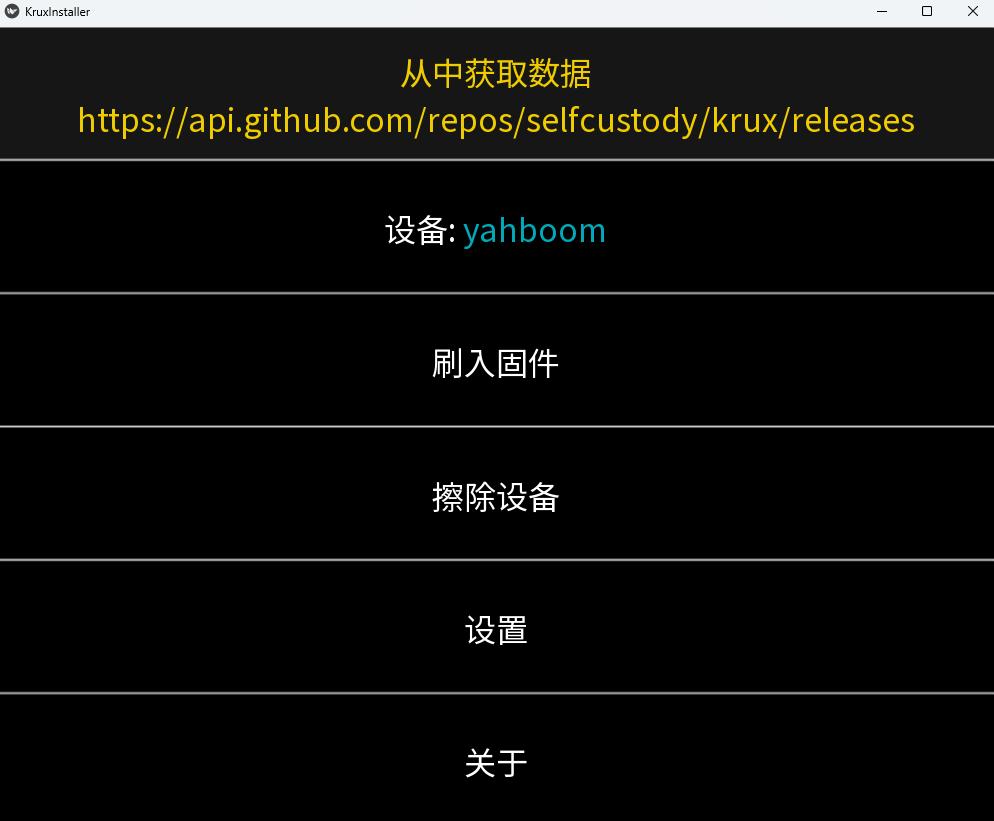
Ensure that your k210 development board is connected. Then click "Flash Firmware" to automatically complete the Krux firmware download and flashing. This process may require one or two manual confirmations but is extremely simple, so no further details are provided.
The installed version is the latest Krux firmware. At the time of writing, it was version 25.03.0.
After flashing, your k210 development board will restart and enter the Krux main interface.
Features and Usage Reminders
Language Switching
On the Krux main interface, click "Settings", which includes a "language" option. Enter "language", use the screen's bottom < and > to switch languages, and when you see "Language Environment zh-CN", click "Go" to confirm the language selection.
Although Chinese is supported, some translations are still quite awkward. For example, here "Go" is translated as "去", which is not an appropriate translation.
Switch Theme
In the menu at the same level as "Language", there is an "Interface" option where you can select the color theme of the interface. There are 5 available themes.
(Firmware Layer) Security Features
In the menu at the same level as "Language", there is also a "Security" option that contains options related to firmware-level security features. A complete description can be found on this page. Here, only two key features are briefly introduced:
- Hide seed phrase. After this function is enabled, for the seed phrase imported by the user, Krux will not display the appearance of the seed phrase/private key, nor will it display the backup tool.
- Tamper-proof checksum/TC Flash Hash at startup. These two are complementary functions aimed at preventing tampering with the Krux firmware in the device. Users need to first set the "tamper-proof checksum", then the device will require the user to take photos with the camera to generate sufficient random data to fill the storage space; then, this checksum will be used to hash the entire storage space and verified by the TC Flash Hash function to check if the storage space has been tampered with.
- The "TC Flash Hash at startup" relates to whether the device is required to perform such a tampering check every time it boots.
- However, please note that the tamper-proof checksum can prevent others from using your device, but it cannot prevent accessing or flashing the storage space via USB. That is to say, you must remember whether you have enabled this function: if you have enabled it, but the device does not require you to enter the checksum when booting, or entering an incorrect checksum does not affect its operation, it means your device has been tampered with (by modifying the entire machine to cancel your checksum).
Generating Seed Phrase
Krux has four ways to generate a seed phrase (interestingly, none of them use the device's own entropy source):
- "Via Camera". Obtaining entropy source by taking photos.
- "Via Words". Note: The correct usage of this method is: print out the BIP39 word list, cut each line (cut to the same length), mix evenly in a jar (box), and then draw 11 or 23 words (refer to this website for the specific process). After obtaining the required number of words, use this function to input them one by one, and then Krux will generate the valid last word for you.
- Absolutely do not bypass the above procedure for creating randomness and input 11 words based on your own feeling, as this is unsafe.
- "Via D6". Using a 6-sided die to create a seed phrase. Enter once for each result thrown. The screen will show your creation progress. To generate a 12-word seed phrase, you need to throw at least 50 times (totally worth it!).
- "Via D20". Using a 20-sided die to create a seed phrase.
Encrypted Storage of Seed Phrase
Krux supports using a Passphrase, and supports encrypting and storing the seed phrase on an SD card or device flash memory, or printing it as a QR code. When using such functions, please be very cautious and consider backup issues carefully.
Menus After Creating/Importing Seed Phrase
After creating/importing a seed phrase, you may encounter the following four interfaces (which can indeed be somewhat confusing):
- Containing these options: "Load Wallet", "Passphrase", "Customize", "Return" (referred to as Interface 1 below)
- Containing these options: "Backup Seed Phrase", "Export Extended Public Key", "Wallet", "Address", "Signature", "Restart" (device restart) (Interface 2)
- Containing these options: "Wallet Description", "Passphrase", "Customize", "Return" (referred to as Interface 3 below)
- Containing these options: "Network", "Policy Type", "Script Type", "Account" (referred to as Interface 4 below)
If you create a new seed phrase, the order of interfaces you encounter may be from 1 to 4; if you import a seed phrase, you will encounter the opposite order (from 4 to 1). Specifically:
- Selecting "Load Wallet" on Interface 1 will enter Interface 2;
- Selecting "Wallet" on Interface 2 will enter Interface 3;
- Regardless of which interface, "Customize" will jump to Interface 4.
But understanding the functions corresponding to these options makes the usage order easy to grasp:
- Interface 2 contains the basic functions of the wallet, such as exporting extended public keys, viewing addresses, and signing;
- The "Wallet Description" on Interface 3 is to explain the specific script used by the wallet by importing a "wallet descriptor"; it has some alternative relationship with Interface 4;
- The settings on Interface 4 are detailed configurations of the usage environment for the seed/wallet. For example, if you want to use a multisig wallet on the testnet, you need to set the "Network" and "Policy Type". Similarly, you can choose "Single-sig" in the "Policy Type" and then adjust the "Script Type" (P2PKH or P2WPKH).
In summary:
- If you have set a Passphrase, you should import it as soon as possible.
- The settings on Interface 3 and Interface 4 should be supplemented according to your actual usage needs. More comprehensive information will definitely help your usage (such as making the public key information sent by your device more accurate, and allowing information scanned from software wallets to be displayed correctly).
(End)