What is a Solana Token Lock?
On Solana, token locking (also known as token vesting or token lock) refers to temporarily "locking" a certain amount of SPL tokens (including regular tokens or liquidity pool LP tokens) through a smart contract, preventing them from being transferred, sold, or used before a set future date.
The most common uses include:
- Locking up tokens held by the project team/organization → Preventing short-term sell-offs and building long-term confidence.
- Locking up liquidity pool (LP) tokens → Proving to the community that "there will be no rug pull" (withdrawing liquidity and running away).
- Set up a phased vesting plan for investors, private equity firms, advisors, etc.
Once the lock is created, the tokens are transferred to a time-controlled contract address and can only be withdrawn after the unlock time arrives (some tools support one-time unlocking, while others support linear/segmented release).
The following section uses GTokenTool ( https://sol.gtokentool.com ) as an example to explain in detail how to create a Solana token lock.
Preparatory work
- A computer or mobile phone that can connect to the internet.
- Solana wallets (such as Phantom, Solflare, etc.) are already installed.
- The wallet is connected to the Mainnet Mainnet.
- Keep at least 0.03 SOL in your wallet (to pay the transaction fee for creating the lock; the actual amount is usually lower, but it's recommended to have more).
- You already hold the SPL tokens to be locked (you can see the balance in your wallet).
- If you are using a domestic network environment, it is recommended to prepare a VPN/accelerator to ensure a stable connection with the Solana RPC node.
Complete steps to create a token lock using GTokenTool
1. Go to the creation page and connect your wallet.
Open your browser and visit: https://sol.gtokentool.com/zh-CN/locks/createLock . Click the "Connect Wallet" button on the page, select your Phantom or other wallet, and approve the connection. Ensure that the network icon in the upper right corner displays Mainnet.

2. Select the tokens to lock
In the token selection box in the middle of the page, enter or search for the Mint address (contract address) of the token you want to lock, or select from the drop-down list.
After selection, the page will automatically display:
- Token symbol, name
- Decimal places
- Your current available balance in your wallet
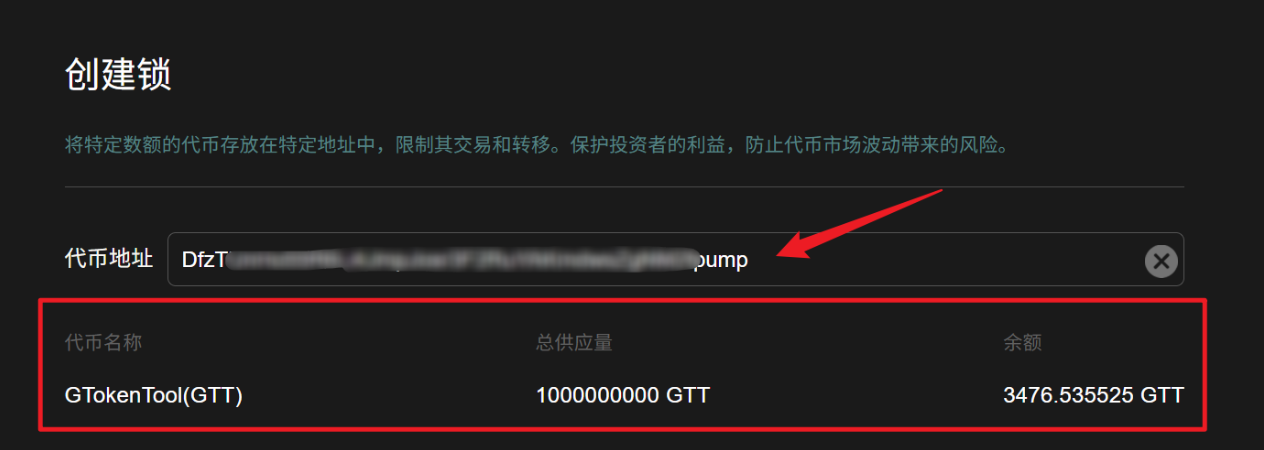
3. Fill in the basic parameters of the lock.
Fill in the following three core fields:
- Lock Name: Choose any easy-to-remember name, such as "Team Token Lock - 2026" or "LP Lock - 1 Year" (for your own management only, and will not affect on-chain data).
- Lock Amount: Enter the amount of tokens you want to lock. Note: This cannot exceed the available balance displayed in your wallet (it is recommended to enter an integer or retain the necessary decimal places).
- Unlock Date: Select a specific date and time in the future. This is when the tokens can be withdrawn. It is recommended to set it from 3 months to several years in the future (depending on the project plan).

4. Create a lock & confirm the transaction
After verifying that the above information is correct, click the "Create" button at the bottom of the page.
The wallet will pop up a transaction confirmation window, displaying:
- Network fees of approximately 0.01~0.03 SOL
- Transaction details (transferring tokens to a locked contract)
Click "Confirm" → Wait a few seconds to a dozen seconds, and the transaction will be successfully recorded on the blockchain.
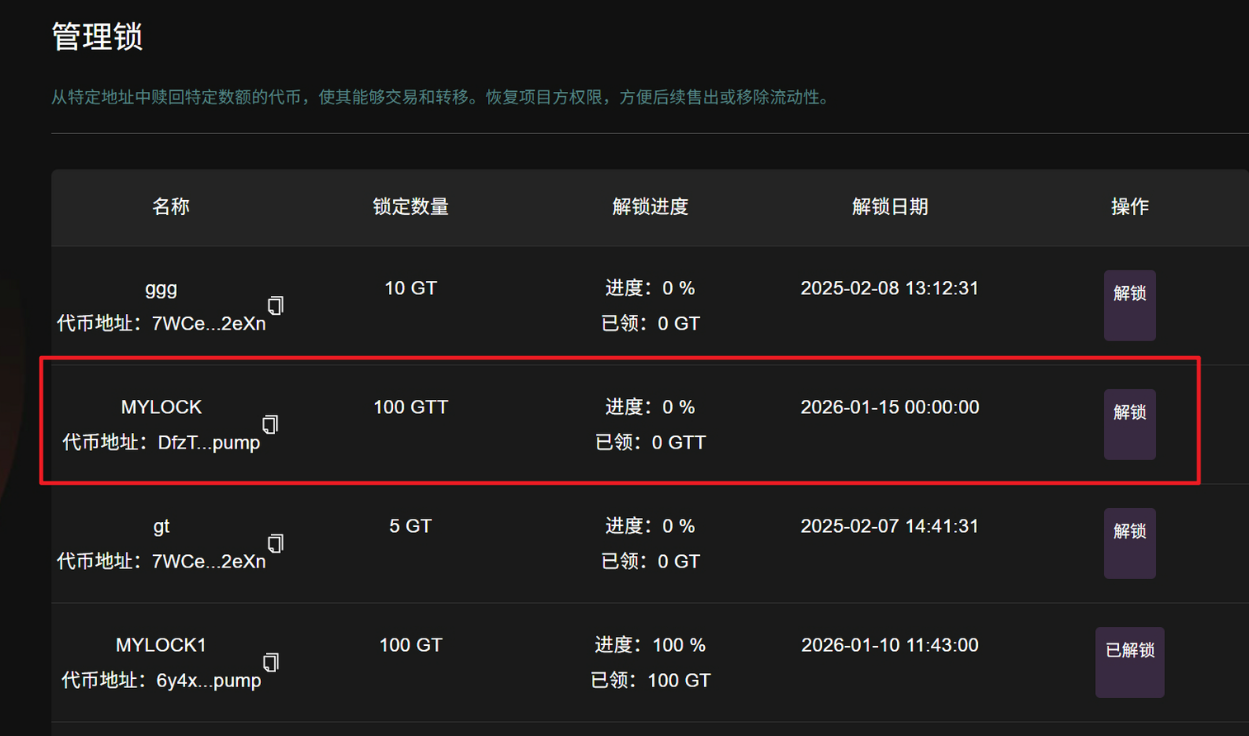
5. View and manage created locks
After successful creation, the page will automatically redirect or prompt you to go to the management page: https://sol.gtokentool.com/zh-CN/locks/managementLock Here you can:
- View all the locks you created
- See the status of each lock (locked/unlocked)
- The on-chain address of the replication lock is shared with the community.
- Retrieve tokens here upon expiration.
Precautions & Frequently Asked Questions
- Cost: Typically only 0.01~0.03 SOL, far lower than locking tools in the Ethereum ecosystem.
- Irreversible: Once created and confirmed, the tokens are truly locked, and no one (including yourself) can withdraw them before the unlock date.
- Prove transparency: It is recommended to post the lock's transaction hash or lock address on Twitter/Telegram so that the community can verify it via Solscan.
- After unlocking: Once the designated time has elapsed, return to the management page and click "Retrieve".
- Risk Warning: Virtual asset prices fluctuate wildly. Locking up assets does not guarantee preservation of value. Please assess the risks yourself before proceeding.
By following the steps above, you can create a Solana token lock in 2–3 minutes.